mww2
mww2
Effortless DLNA Windows Setup: Share Media Across Your Devices
Turning your PC into a home media server feels like giving your tech life a new purpose. DLNA makes that possible. If you’ve got a Windows computer and devices like a smart TV or game console, DLNA helps you stream music, photos, or videos without needing apps or cables. It works quietly in the background through your home network.
DLNA Windows setup doesn’t require advanced knowledge. It’s already built into Windows—you just need to turn it on, point it toward your media folders, and allow access to other devices. This guide walks you through what DLNA is, how to get it running, and what to do if it doesn’t work right away.
What Is DLNA, And How Does It Work on Windows?
DLNA stands for Digital Living Network Alliance. It’s a standard that lets your devices talk to each other and share media. When you enable DLNA on your Windows PC, it becomes a local server. Your smart TV, gaming console, tablet, or even another computer can then access videos, music, or pictures directly from your PC.
Unlike cloud-based systems, DLNA works entirely over your local network. It doesn’t use internet bandwidth or require logins, making it ideal for private, smooth media streaming. If your devices are DLNA-enabled—and many current ones are—they can locate and play anything in the public folders on your computer.
The beauty of DLNA is that it’s easy. It’s hassle-free. It turns on and simply works. Stream home movies to your TV, listen to music from your tablet, or share family photos on a console—all from one hub without needing cables or setups.
DLNA Windows Setup: Getting It Running
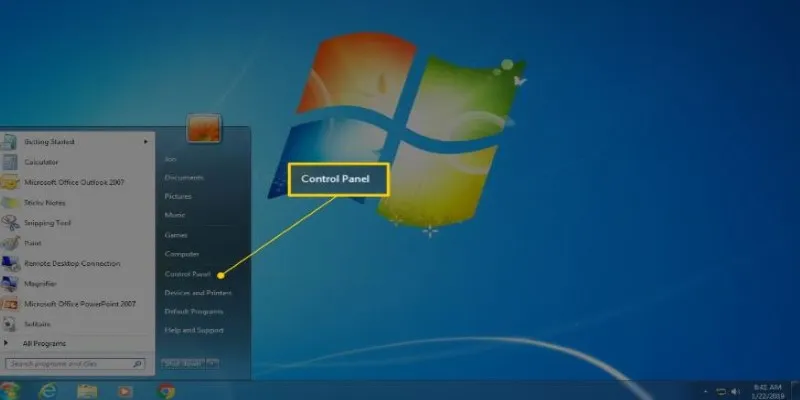
Getting DLNA running on your Windows PC is a matter of a few simple steps. Begin by opening the Control Panel and entering “Media streaming options” into the search field. When it comes up, click it. Choose a screen with a button that says, “Turn on media streaming.” Click on that to turn your DLNA server on. When turned on, your PC will be able to share media with other devices connected to your home network.
Below the button, Windows will display a list of devices currently connected to your network. Each one can be allowed or blocked from accessing your shared media. For most home setups, it’s safe to allow all devices on your private network. This gives your smart TV, tablet, game console, or other PCs access to the shared content.
The next step is opening Windows Media Player. It may seem outdated, but it’s still used to manage DLNA sharing. Go to the “Stream” menu at the top and enable both “Automatically allow devices to play my media” and “Allow remote control of my player.”
Now, you need to choose which media folders your PC will share. Click “Organize” > “Manage Libraries,” and add your music, video, and picture folders. These become the content DLNA makes available to other devices.
After completing these steps, your Windows PC becomes a media server. As long as it stays on and connected to your home network, other DLNA-compatible devices can find it and stream your shared media instantly.
Fixing Common Issues and Improving Performance
Sometimes, DLNA doesn’t work right out of the gate. If your devices can’t see the PC, first make sure they’re on the same network. DLNA only works locally. If one device is on Wi-Fi and the other on a separate network or guest mode, they won’t connect.
Firewall settings may block DLNA. Go to “Media streaming options” again and ensure your network is set to private. Public networks restrict sharing. You can also adjust firewall rules manually, but switching the network type is usually enough.
Another issue can be file compatibility. DLNA doesn’t convert files. If your device can’t play a file format, it will either skip it or fail to load. That’s not a DLNA issue—it’s a limitation of the playback device. Using a universal player like VLC can help on mobile or desktop.
For best results, especially with larger video files, try to use a wired Ethernet connection for the PC. Wi-Fi can work but might struggle with HD or 4K files. Modern routers with dual-band signals or Wi-Fi 6 can help, but distance and interference still matter.
Real-World Uses for DLNA at Home
Once DLNA is live, it becomes part of your routine. Say you’ve got a media collection on your PC in the bedroom. You’re on the living room couch with a smart TV. Open the TV’s media player app, look for the DLNA server, and browse your videos. Pick one, and it streams instantly.
The same goes for music. Maybe your playlists are on your laptop, and you want to stream them to a speaker or tablet in the kitchen. DLNA-capable apps like VLC or BubbleUPnP can pick up your shared music folders on mobile.
DLNA also works with game consoles like PlayStation or Xbox. These devices often have built-in media players that can find your Windows DLNA server. It’s a useful way to play videos or view photos without needing USB drives.
One of the best things about DLNA is that your content stays local. You don’t upload anything, you don’t deal with internet lag, and streaming subscriptions do not limit you. You control what’s available and who can access it.
Conclusion
DLNA might not be flashy or new, but it still delivers. With just a few steps, your Windows computer can become a media hub for your whole home. The setup is simple: enable streaming, select the right folders, and allow your devices to connect. After that, everything works behind the scenes. The DLNA Windows setup turns a regular PC into something more useful—something that helps you share your content wherever you are in the house. No logins, no third-party apps, just smooth, local media streaming. It’s not about keeping up with trends. It’s about using what already works quietly and reliably.
Related Articles
How to Simplify Marketing: The 12 Best AI Tools for Social Media Management

The 7 Best Social Media Management Tools in 2025: Elevate Your Online Presence
5 Best Alternatives to Media Player Classic for a Smooth Viewing Experience
Use PowerToys Run to Mimic Mac's Spotlight in Windows

The Ultimate Comparison: Hootsuite vs. Buffer for Social Media Success
The Ultimate Comparison: Hootsuite vs. Buffer for Social Media Success
Use PowerToys Run to Mimic Mac's Spotlight in Windows
Upgrade Your Streaming: 5 Chrome Extensions to Enhance Video Quality
Best OBS Alternatives for Low-End PCs & High-End Production
20+ Best Digital Marketing Tools
Fix Media Upload Issues on Websites and Apps with These Steps
Unlock Windows 10: 5 Free Activation Tools to Try
Popular Articles

The Ultra HD 4K TV from Sony at CES 2014 That Stole the Spotlight
Product Roadmaps

The Best Calendar Apps for Windows in 2025: Stay Organized and On Track
Recording DVD Movies with VLC: Simple Methods You Can Use

Best Free Ways to Convert DAT Video Files into VOB Format
Top 8 Free Video Editors Reviewed and Compared in Detail
How to Integrate Notion with Slack for Seamless Team Collaboration
How to Ensure Your YouTube Uploads Stay Crisp in 720p, 1080p, and 4K

The 9 Best Gantt Chart Software Tools to Streamline Your Projects

Master the Art of Importing and Editing MTS Files on Mac
Create Your E-Signature Fast: Top 6 Digital Signature Tools