mww2
mww2
How to Get Smooth Slow Motion in After Effects Without Choppy Frames
There’s something about slow motion that captivates audiences. Whether it’s highlighting a quiet moment or enhancing an action scene, slow motion can elevate your footage. However, achieving smooth slow motion, especially with footage not shot at high frame rates, requires more than just slowing down a clip. You need to master the tools and techniques in After Effects to get it right.
Here’s a comprehensive guide to achieving smooth, slow motion without choppy frames or awkward warping. Let’s dive into the steps to achieve clean, fluid motion that enhances your scene.
Choosing the Right Footage and Setup
Before you even open After Effects, the quality of your slow motion largely depends on your original footage. Higher frame rates, such as 60fps or 120fps, provide more flexibility for smooth slow motion. If your footage is at 24fps or 30fps, After Effects has to generate new frames, which can lead to less- than-perfect results, especially with fast movements or busy backgrounds.
To ensure the best results, always aim to shoot with high frame-rate footage. This approach simplifies the process, looks more natural, and minimizes the need for extensive post-production adjustments.
Understanding Time Interpolation Methods
Once your footage is imported into After Effects, choosing the right time interpolation method is crucial. This setting determines how new frames are generated when you slow down a clip.
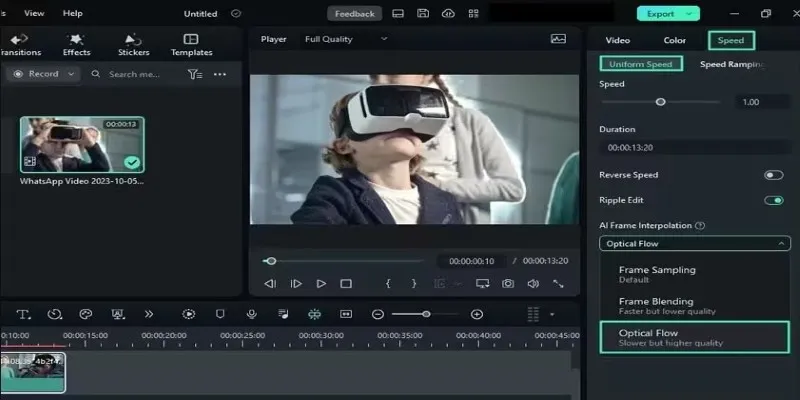
Frame Sampling is the simplest method, repeating or dropping frames to adjust speed. It’s quick but doesn’t enhance smoothness, often resulting in noticeable choppiness.
Frame Blending offers a slight improvement by mixing frames, though it can produce a ghosting effect. It’s suitable for some shots but not ideal for crisp motion.
Optical Flow (known as Pixel Motion in After Effects) analyzes the footage to create new frames that match the motion. This method can produce seamless slow motion but may result in warping or texture issues if it struggles to interpret the footage accurately.
For the best results, use Optical Flow, but be ready to make adjustments as needed.
Applying Effects for Smoother Motion
After selecting your interpolation method, decide how to apply slow motion. In After Effects, Time Remapping and Timewarp are popular tools for this purpose.
Time Remapping
Time Remapping allows keyframe control over clip speed, enabling you to slow or speed up sections and create smooth transitions.
To use Time Remapping:
- Right-click the clip and choose Time > Enable Time Remapping.
- Set keyframes where speed changes should occur.
- Stretch keyframes apart to slow down the section.
Use the Graph Editor for a natural flow. Select keyframes, hit F9 (Easy Ease), and adjust handles for smooth transitions.
Timewarp
Timewarp is an effect from the Effects > Time menu, ideal for slowing down an entire clip uniformly.
How to use Timewarp:
- Set Speed to less than 100% (e.g., 50% for half speed).
- Select Pixel Motion for accurate frame generation.
- Adjust Vector Detail and Smoothing as necessary.
Timewarp leverages the same engine as Optical Flow, providing additional controls to minimize distortion. Choose between Timewarp and Time Remapping based on your clip’s needs.
Fixes, Workarounds, and Extra Tools
Despite careful planning, unexpected issues like rubbery arms or blurred objects can occur. These are typical challenges when Optical Flow misinterprets footage.
Here are some solutions:
- Mask specific areas and apply different interpolation methods.
- Use Directional Blur or CC Force Motion Blur to conceal errors.
- Pre-render the slow-motion clip and re-import it for a smoother workflow.
- Duplicate the layer and experiment with effects on the copy.
For complex scenes with fast motion or intricate backgrounds, consider using a plugin like Twixtor. It offers advanced controls for high-quality slow motion, often outperforming standard methods in After Effects.
Twixtor provides precise tuning for motion sensitivity and object isolation, delivering superior results for professional projects.
Final Thoughts
Achieving smooth slow motion in After Effects requires the right footage, settings, and sometimes a bit of trial and error. Start with high frame-rate footage for the best foundation. Decide between Time Remapping and Timewarp based on your needs, and always fine-tune your interpolation settings. While Optical Flow is often effective, it isn’t flawless. Being able to identify and correct issues—whether through masking, blurring, or pre-rendering—can greatly enhance your final product.
Related Articles

How to Easily Create Smooth Slow-Motion Videos in Adobe Premiere

SkedPal vs. Motion: A Detailed Comparison to Find Your Perfect Scheduling App
Creating Smooth Slow-Motion Videos in iMovie: A Simple Guide
How to Reverse Video Footage in After Effects and Best Alternatives
Top 5 Video Stabilization Tools for Professional-Quality Footage
Top 5 Video Stabilization Tools for Professional-Quality Footage
Popular Articles
The Simple Way to Get iMovie on Mac—and What to Use on Windows

3 Easy Ways to Transform AVCHD Files into AVI Format

Best iPod Video Converters to Watch Any Format on Your iPod

7 Easy Steps to Use Your Customer List for Creating Custom Audiences on Facebook

MPG File Guide: How to Open, Play, and Convert MPG Videos Easily

Boost Your Writing: 5 AI Tools to Improve Your Content

Enhance Customer Support with Affordable Help Desk Software
The Best Flowchart Software and Diagram Tools in 2025: A Comprehensive Guide
Bringing Old Footage Back to Life: A Video Remastering Guide

Camtasia Screen Recorder Review: Features, Pros, Cons, and Alternatives
Top 5 Mobile Scanning and OCR Software to Use in 2025