mww2
mww2
How to Make a Memory Video on iPhone That Wows Your Friends
Using your iPhone to capture everyday memories is convenient, but transforming those snapshots into a captivating video often seems daunting. Whether it’s travel adventures, family gatherings, or daily highlights, memory videos are a wonderful way to showcase your experiences. Fortunately, your iPhone provides all the tools you need to create stunning videos without requiring advanced editing skills.
Method 1: Create a Memory Video Using the Photos App

Your iPhone’s Photos app includes a feature called “Memories,” which automatically crafts short video slideshows by grouping photos and videos into themed collections. This feature is user-friendly and perfect for capturing a variety of highlights.
Step-by-Step Guide to Using Memories
- Open the Photos App: Launch the Photos app on your iPhone and tap the “For You” tab in the bottom menu. This section features pre-curated memory videos created by your iPhone.
- Explore Existing Memories: Browse through the “Memories” carousel to find any pre-made videos based on events, locations, or time frames.
- Edit and Customize the Memory Video:
- Open Memory: Select a memory you want to customize and press play.
- Style and Music: Tap the screen during playback, then select the “Edit” button (three dots) to change the video style and music. Options like “Dreamy,” “Sentimental,” or “Happy” come with unique soundtracks.
- Rearrange Content: To add or remove specific photos or clips, tap “Edit Photos” to tailor your collection.
- Save and Share: Once satisfied with your video, tap the share button in the top-right corner to save it or share via Messages, Email, or social media.
Why Choose the Photos App?
The Photos app is perfect for creating memory videos quickly, thanks to its automatic curation and varied music styles that give your videos a polished appearance with minimal effort.
Method 2: Create Stunning Memory Videos with iMovie
For those seeking greater creative control, iMovie is the ideal choice. Unlike the Photos app’s templates, iMovie allows full customization of your video’s content, timeline, transitions, and music.
Step-by-Step Guide to Creating a Video with iMovie
- Install and Open iMovie: iMovie is free and pre-installed on most iPhones. If it’s not on your device, download it from the App Store.
- Start a New Project:
- Launch iMovie and tap “Create Project.”
- Select “Movie” (rather than “Trailer”).
- Import Media:
- Tap “Add Media” to select photos and videos from your library.
- Drag and drop files into your preferred order on the timeline.
- Fine-Tune Your Video:
- Transitions: Tap the transition icon between clips to choose smooth transitions like fade, slide, or dissolve.
- Text: Add titles or captions by selecting the “T” icon and adjusting the text style and position.
- Music: Tap the “+” button to choose music from iMovie’s soundtracks or your music library.
- Enhance Clips: Trim clips, adjust speed, or add filters to set the desired mood. Tap a clip in the timeline to access editing tools.
- Preview and Save: Tap “Done” to preview your video. Save it to your camera roll or share it on platforms like Instagram or YouTube.
Why Choose iMovie?
iMovie provides the tools to craft a fully customized memory video, allowing you to add creative touches and control every aspect of your storytelling.
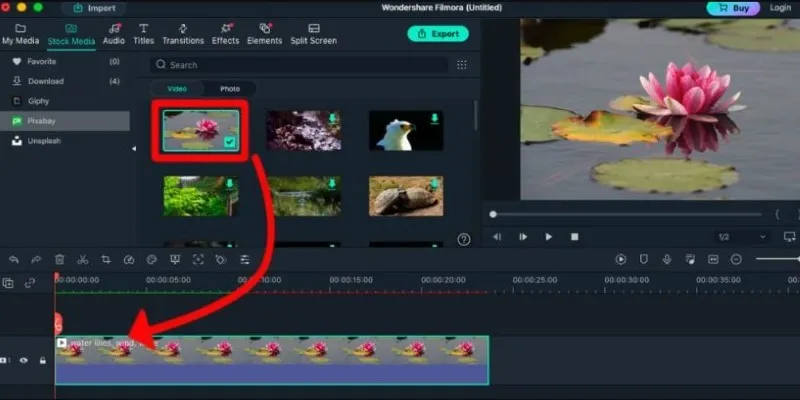
Method 3: Create a Memory Video Using Filmora on iPhone
Filmora is a popular video editing tool that offers features for making professional-looking videos. The FilmoraGo mobile app enables easy creation of memory videos directly on your iPhone.
Steps to Create a Memory Video Using Filmora on iPhone
- Download and Install FilmoraGo: Get the FilmoraGo app from the App Store. Open it to begin your project.
- Start a New Project: Tap “Create New Project” and select the photos and videos you want from your gallery.
- Arrange Your Clips: Organize clips in the desired order by dragging them along the timeline.
- Add Music and Effects: Enhance your video with background music from FilmoraGo’s library or your own. Apply filters, transitions, and text overlays for engagement.
- Adjust Video Settings: Customize further by trimming clips, adjusting speed, or modifying colors and brightness.
- Preview and Finalize: Use the preview option for review. Make final edits before exporting.
- Export and Share: Export your video to save it on your device or share directly on social media.
Why Choose Filmora Video Editor?
Filmora Video Editor is user-friendly and offers a range of features for creating professional-looking videos without needing advanced skills. It supports everything from basic editing to advanced effects and animations.
Tips for Creating a Professional-Looking Memory Video

- Stick to a Theme: Choose a consistent theme, like a vacation or event, to create a cohesive narrative.
- Maintain a Consistent Style: Use similar filters, colors, or effects across clips for a polished look.
- Keep It Short: Aim for a video length of 1 to 3 minutes to maintain viewer engagement.
- Focus on Quality Clips: Select your best photos and videos, prioritizing clarity, composition, and emotional impact.
Conclusion
Creating a stunning memory video on your iPhone is easier than you might think. By selecting a theme, maintaining a consistent style, and focusing on quality, you can craft a video that beautifully encapsulates your memories. With a little creativity and attention to detail, you can transform cherished moments into a lasting treasure.
Related Articles

3 Easy Ways to Create a Stunning Memory Video on Your iPhone

How to Combine Videos on iPhone: 4 Top Apps for Easy Editing

The Ultimate Guide to Converting iPhone Videos to MP4

LightCut 2025 Review: The Best Video Editor for Android and iPhone

Step-by-Step Tips to Create Engaging Tutorial Videos That Your Audience Will Love
How to Easily Edit and Trim Videos on Your Android Devices

How to Fix Corrupted Videos on Windows: A Step-by-Step Guide
Mute Any Video on Desktop in Seconds: The Ultimate Guide
Perfect Your Video Framing: A Guide to Cropping in Filmora

Convert iPhone Photos to JPEG: Quick and Easy Methods
Top 5 Video Stabilization Tools for Professional-Quality Footage

Top 5 Free Video Enhancers to Instantly Boost Video Quality
Popular Articles
Get the Perfect Frame: Cropping and Ratios in CapCut
A Step-by-Step Guide on Creating Todoist Tasks from Voice Memos with OpenAI

How Can You Easily Stay Data Privacy Compliant Using Iubenda? (5 Practical Steps for Website Owners)

How to Get Your Webflow Form Responses into Google Sheets — A Quick and Easy Guide

10 Effective Ways to Prevent Spam Registrations on Your WordPress Membership Site
How to Convert JPG to SVG: The Best Methods for Beginners and Experts

Top 5 M3U8 Players for Online, Web, Windows, and Mac

Which Are The 6 Best PDF Editor Apps To Simplify Your Workflow: A Guide

What Is the Best Cap Table Management Software for Startups?

ECommerce Platform Comparison: Find the Best Fit for Your Business
How to Easily Convert MOV to MP3 Across Multiple Devices