mww2
mww2
Cropping Videos in Filmora: A Simple Guide for Clean Edits
Shooting a great video is exciting, but sometimes, distractions or too much space in the footage can detract from the final product. Cropping is a simple yet powerful editing tool that allows you to remove these distractions and focus on your subject. Filmora makes cropping easy, even for beginners, so you don’t need to be a tech expert to enhance your video.
Filmora is designed with user-friendliness in mind, making video editing straightforward. Cropping in Filmora is simple and accessible, with no complex steps. This guide will show you how to crop effectively, covering everything from the benefits to using the tool itself. By the end, you’ll be confident and ready to crop your footage with ease.
Why Cropping Videos Matters More Than You Think
Cropping might seem like a basic edit, but it can completely change the feel of a video. When you crop a video, you’re not just cutting out part of the frame—you’re deciding what the viewer should focus on. Whether you’re tightening up a wide shot, removing cluttered backgrounds, or repurposing content for social media platforms like Instagram or TikTok, cropping can do the job without needing to reshoot anything.
In Filmora, cropping also helps maintain a consistent visual style. If you’re working with footage from different cameras or formats, you might need to adjust the framing to make everything look cohesive. This tool is especially useful when combining footage with different resolutions or when your camera isn’t perfectly aligned.
Another use case involves converting videos from landscape to portrait or square for different platforms. For example, if you want to use a horizontal YouTube video on your Instagram story—a vertical format—cropping can help you fit the screen properly, avoiding awkwardly squished or overly letterboxed clips.
The cropping process in Filmora is non-destructive, meaning you can adjust the crop at any point. This flexibility makes it easy to experiment and find the best framing for your scene.
Step-by-Step Process of Cropping in Filmora
Cropping a video in Filmora is a visual process—it relies more on your eye than your technical know-how. Once you get a feel for it, it becomes second nature.
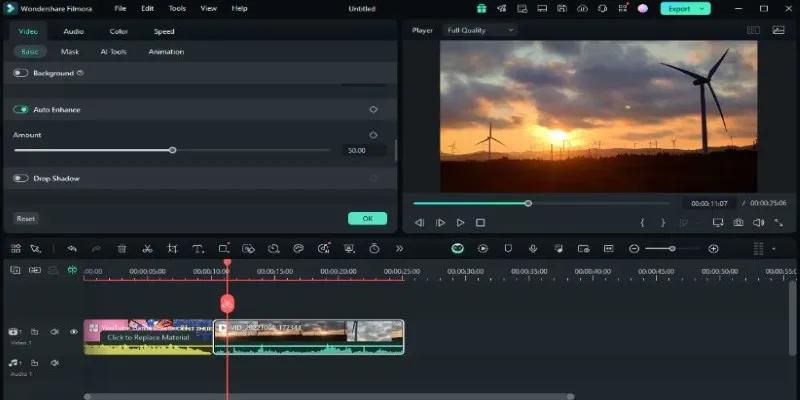
Start by launching Filmora and importing your footage. Drag your clip into the timeline, which is your workspace for editing. Click on the clip in the timeline to select it. An array of editing options will appear, including the crop icon, which looks like two overlapping right angles. Click it.
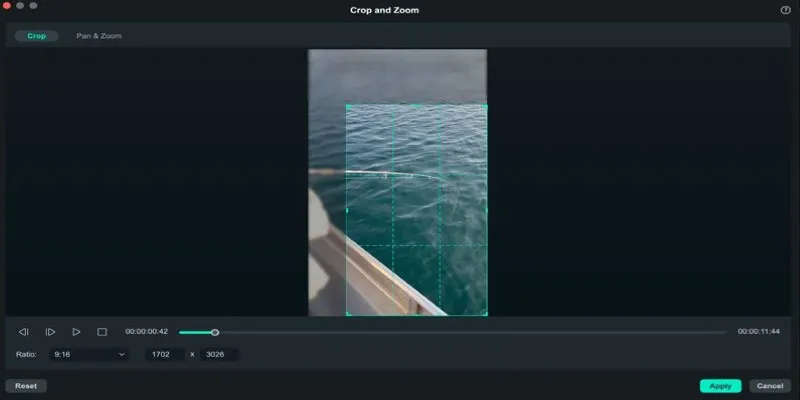
This will open a new window called the Crop and Zoom panel. You’ll see a frame over your video, which serves as your cropping tool. You can grab the corners of the frame to resize it or drag the entire frame to reposition it. Preset aspect ratios are available at the bottom of the panel, such as 16:9, 1:1, and 9:16, which are useful for platform-specific editing or maintaining uniformity in your project.
You can also choose Custom for a freeform crop, giving you full control but requiring a careful eye to keep things balanced. During cropping, ensure the subject stays centered or aligned naturally. Once satisfied with the framing, click OK. Filmora will crop the video according to your selection.
After cropping, it’s wise to play the video in the preview window to check the result. Look out for anything that appears too tight or off-balance. If you need to make changes, simply click on the crop tool again and adjust.
Note: Cropping will zoom into your footage to fill the frame. Excessive cropping can lead to a loss of quality or a pixelated appearance. Always monitor how much you’re trimming, especially when working with lower- resolution footage.
You can also animate your crop using the Pan and Zoom feature, located in the same window. This feature allows for movement in your crop box, enabling you to slowly zoom in or pan across the video while it plays. It’s a useful trick for adding motion to static shots or drawing attention to different parts of the scene without cutting.
Things to Consider While Cropping in Filmora
Cropping in Filmora involves more than trimming the frame; it significantly impacts composition, clarity, and viewer experience. Before adjusting the crop box, consider the placement of your subject. If you’re filming a person, avoid cropping out key parts like their forehead or chin unless that’s your intended look. When dealing with objects, ensure the frame feels balanced, with everything positioned correctly.
The aspect ratio you choose is crucial. For YouTube content, use 16:9. For Instagram Reels or TikTok, opt for 9:16, and for Instagram posts, use 1:1. This not only helps your video fit the platform properly but also prevents any unwanted cropping when uploaded.
Cropping affects other elements like text, transitions, and overlays. If you’ve added these, cropping afterward could disrupt the alignment. It’s usually best to crop early in the editing process, then move on to other adjustments like color correction or effects.
Be mindful of video quality when cropping. Cropping zooms in, which may degrade resolution if overdone. Filmora handles this well, but if quality drops, consider using a higher-resolution source.
Filmora’s preview feature is invaluable—always review your edits before finalizing them to catch any potential issues.
Conclusion
Cropping videos in Filmora is a simple yet powerful way to enhance your footage. Whether you’re adjusting for composition, removing distractions, or preparing your content for different platforms, Filmora’s easy-to-use crop tool helps you achieve a polished result. By following the steps outlined in this guide, you can quickly master cropping and improve the overall quality of your videos, ensuring they always look their best before sharing or publishing.
Related Articles

PowerPoint Image Compression: Reduce File Size Without Sacrificing Clarity
A Comprehensive Guide to Create Form Sections and Logic in Google Forms

How to Combine Videos on iPhone: 4 Top Apps for Easy Editing

6 Ways Businesses Are Using AI in eCommerce to Stay Competitive

How to Convert MPEG to WAV: A Step-By-Step Guide

Quick and Simple Ways to Create GIFs from MOV Videos

5 Simple Ways to Convert 3GP to MP4 Effortlessly

3 Easy Ways to Create a Stunning Memory Video on Your iPhone

How to Easily Convert AVI to MOV Using 4 Reliable Tools
Cropping Videos in QuickTime: Step-by-Step Guide and Alternatives
Everything You Need to Know About CapCut Video Upscaler
Best Free Online Converters for Converting JSON to CSV Quickly
Popular Articles

Find the Best Affordable Action Cameras as Alternatives to GoPro
Top AVI to 3G2 Converters for Quick Format Conversion

The 8 Best Email Apps for iPhone in 2025 to Keep You on Top of Things

Which Are The 5 Best Pomodoro Timer Apps to Boost Your Productivity in 2025

Which Are The 7 Best URL Shorteners: Simplify Your Links in 2025

Top 7 Methods for Effortless MP4 to MOV Conversion

Securing Access: The Simple Power of OAuth and 2FA

WeVideo: A Browser-Based Video Editor That Actually Makes Life Easier
Why BuzzKill Is the Best Way to Manage Android Notifications

5 Easy Ways to Download from GitHub: A Step-by-Step Guide

Meta AI vs. ChatGPT: Key Differences and Which Is Better for You