mww2
mww2
How to add an email signature in Outlook
Enhance Your Professional Image with an Outlook Email Signature
Establishing a professional email signature significantly boosts your communication skills and reputation. With Outlook, adding such a signature is straightforward. It saves time and ensures consistency, whether you’re using Outlook for personal emails or business correspondence. Many users are unaware that Outlook allows for personalized email footers, complete with logos, links, and contact details.
Setting up your Outlook email signature not only improves its appearance but also strengthens your branding. This guide will walk you through the steps to create, format, and apply custom signatures in Outlook. We’ll also cover adding them to forwarded messages and replies. With the correct settings, every email you send will appear professional. Upgrade your online profile by learning how to add an email signature in Outlook.

Open Outlook and Access Settings
Begin by launching the Outlook desktop program on your PC. Click “File” in the top-left corner, then select “Options” from the bottom of the menu. A window with various tabs will appear on the left. Click on “Mail” to view email settings. Look for the section titled “Create or modify signatures for messages” and press the “Signatures” button to open the email signature pane.
In this new window, you have control over various signature options. You can either update an existing signature or create a new one. Outlook allows you to create multiple email signatures, which can be linked to different email addresses, making it simple to manage both personal and business accounts. Access the signature section to begin personalizing how others view your emails.
Create a New Signature
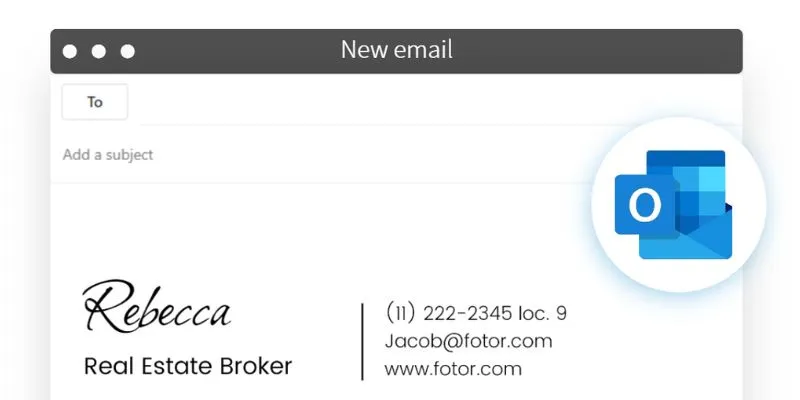
Inside the signature window, click the “New” button to start building your signature. A prompt will ask for a name—type something like “Work” or “Personal” for organization. Once named, enter your details in the large white box: your name, job title, phone number, and email address. If necessary, add your website or social media links. Click the image icon to insert your company logo.
Formatting tools allow you to select font style, size, and color. Keep the design professional and neat. Avoid using too many different fonts or colors. Use lines or divisions to enhance visual structure, ensuring the layout is compact yet readable. Double-check your contact information, as a single error could confuse your recipient. A well-crafted signature enhances professionalism and trust in your correspondence.
Set Signature Defaults for New Emails and Replies
Outlook provides options under the signature editor for when to use your signature. You’ll find two dropdown menus—one for new emails and another for replies and forwarding. Use the first dropdown to apply your signature to new messages. Select the signature you just created. Do the same for the second dropdown if you want it on replies. Some people prefer not to include it in replies for brief communications, while others require it on every email.
Your style or corporate policy will guide this decision. Setting this up now saves time later, as you won’t need to manually insert it each time. These settings apply only to the selected email address. If you use multiple Outlook accounts, repeat the process for each one. Remember to click “OK” to save everything. Your default settings will now automatically apply as you write emails.
Manually Add Signatures When Needed
There may be times when you don’t want to use your default signature. Outlook allows you to insert it manually. Start a new email message and go to the message tab at the top. Click the “Signature” dropdown menu and choose the signature you wish to use. It will instantly appear in the message body, and you can make quick edits if necessary. This feature is handy when managing personal and business correspondence or when you need to omit it for internal communications.
Outlook gives you the flexibility to use or omit your signature as needed. Manual insertion is useful when responding from shared or generic accounts, keeping messages relevant to the situation. Outlook will not add a signature unless you specifically choose to. Always preview your message before sending to ensure everything looks good. Manual insertion provides more control when managing various communication needs.
Use Signatures Across Devices with Outlook Web App
Many people access Outlook via a browser or mobile device. The Outlook Web App (OWA) supports email signatures as well. Log in to Outlook.com with your account, click the settings gear in the top corner, and select “View all Outlook settings.” Navigate to “Mail” and then “Compose and reply.” Like the desktop version, you’ll find a signature editor here. Type or copy your signature into this editor.
Enable the checkboxes to include your signature in every new message and response, saving time on mobile and tablet devices. Web signatures are saved in the cloud, ensuring your signature appears on any device you use. Your signature should remain consistent across all devices. Remember to update it here if you make any changes later. Note that signatures on mobile apps must be changed individually. The online Outlook version ensures your email always appears clean and consistent on any screen.
Best Practices for an Effective Email Signature
Your signature should be neat, professional, and concise. Start with your full name and position, and include your phone number and professional email address. If appropriate, add a corporate logo and a website link. Avoid overly ornate fonts or colors; a clean design is more appealing across devices. Use no more than two font styles and keep font size between 10 and 12 points. Include professional social media profiles if relevant; link personal profiles only if necessary.
If your company requires a legal disclaimer, include it here. Avoid jokes or comments that might be deemed inappropriate. Separate your signature from the email content with a line or space. Ensure it is mobile-friendly by previewing it on tablets and smartphones. Good formatting ensures critical elements are not overlooked and improves readability. Always update your signature when your contact information or job changes.
Conclusion
Adding a signature in Outlook is a simple way to present yourself more professionally. A strong signature enhances your brand and facilitates smoother communication. Customize it for your audience and keep it neat and easy to read. Ensure your signature appears on all devices, including web and mobile versions. Regularly check and update your information to maintain accuracy. Learning how to design Outlook signature templates and settings boosts the impact of your email. A small adjustment like this can have a significant effect.
On this page
Related Articles

Streamline Your Email Campaigns: The 7 Best Cold Email Software Options

PowerPoint Image Compression: Reduce File Size Without Sacrificing Clarity

The 10 Best Email Apps for iPhone: Streamline Your Inbox Today

Upgrade Your Email Experience: The 7 Best Email Clients for Windows

Which Are The 6 Best Email Clients for Mac: A Comprehensive Comparison
Upgrade Your Email Experience: The 7 Best Email Clients for Windows

Brevo vs. Mailchimp: Choosing the Right Email Marketing Tool

The Best Email Parsing Software for Automating Workflows: Top Picks for 2025

Boost Engagement: 8 Ways to Automate Your Email Newsletters and Drip Campaigns

The Best Email Drip Campaign Software: Top Picks for Seamless Automation

Proton Mail vs. Gmail: Which is the Best Email Service for You?
How to Capitalize All Letters in Word, Excel, and Other Apps: A Complete Guide
Popular Articles

Top 2 Free Methods to Create Stunning Picture-in-Picture Videos

How to Colorize Photos with Palette AI: A Step-by-Step Guide For beginners

Free Ways to Convert HEVC to MP4 Without Losing Quality

Beauty by the Numbers: 4 Data Visualization Apps for Business Success

Should You Use MOV or MP4? Key Differences You Should Know

Step-by-Step Guide to Making a Video Essay That Inspires

Explore the Best Marketing Podcasts to Improve Your Strategy

How to Easily Change Video Formats on a Mac: Simple Methods

3 Essential Accessibility Tech Tools That Make Work More Manageable

Microsoft Debuts Native Copilot App to Replace Old Web Wrapper

How to Share Audio on Zoom: The Step-by-Step Guide for Beginners