 mww2
mww2
Transform Your Photos into a Musical Slideshow on Mac
Bringing your favorite photos to life is easier than you think. Whether you’re sharing wedding moments, vacation highlights, or a tribute to someone special, crafting a captivating photo slideshow with music on your Mac adds a personal touch. This guide reveals simple methods, insider tips, and recommended tools for creating dazzling slideshows you can share anywhere.
Why Create a Photo Slideshow with Music

Photo slideshows go beyond simple albums. Pairing images with music transforms memories into cinematic stories. They’re perfect for birthdays, family gatherings, graduations, or even professional presentations. The best part? Making them on a Mac is fast, intuitive, and fun, no matter your skill level.
Start with Apple Photos for the Easiest Slideshow Experience
The Photos app on Mac is designed for this kind of project. It’s built-in, free, and user-friendly, making it the go-to option for most users.
How to Make a Quick Slideshow with Photos
- Open Photos and select the album or images you want to use. Hold Command and click to pick specific pictures.
- Click the File menu and choose Create > Slideshow > Photos, then name your slideshow.
- Photos will arrange your images automatically. You can reorder them by dragging.
- Click the Music button to choose a background track. Select from default options or add songs from your Apple Music library.
- Adjust the Theme and Duration at the bottom. Themes like “Ken Burns” add zoom and pan effects.
- Click Preview to check your slideshow. Make edits if needed.
- When ready, hit Export to save your project as a video file for sharing.
This method is perfect for putting together a good-looking slideshow in under 5 minutes.
Customizing Your Slideshow Further
While Photos is simple, you can still add a bit of flair:
- Reorder slides manually for better storytelling.
- Adjust transitions by right-clicking a slide and choosing “Change Transition.”
- Add multiple songs by editing your music selection if the slideshow is long.
- Insert title cards using text slides at the beginning or end.
Level Up with iMovie for Advanced Slideshows
If you want even more control, Apple’s iMovie app offers powerful editing tools for free.
Creating a Cinematic Slideshow in iMovie
- Launch iMovie and create a new project.
- Drag your chosen photos onto the timeline in your preferred order.
- Drag a music file from the Finder or iTunes directly under your photo clips.
- Select each photo to adjust the duration or apply effects like the Ken Burns pan/zoom.
- Add titles, captions, or credits for context.
- Fine-tune your music. Trim, fade in/out, or layer multiple tracks.
- Click the Share button to export your movie or upload it directly to YouTube, Vimeo, or Facebook.
Advantages of iMovie:
- Full control over timing (each slide can last as long as you want)
- Precise music syncing, including volume adjustment and multiple tracks
- Professional transitions, effects, and text overlays
To create sync between image and lyric, split slides to match crucial moments in your chosen song.
Explore Third-Party Apps for Unique Styles and More Features
While Apple’s tools are solid, several third-party Mac apps can unlock new creative possibilities. Here are top picks:
1. Animoto
Animoto is a web-based slideshow maker that works seamlessly on Mac browsers.
- Drag-and-drop interface with stylish templates
- Huge music library with licensed tracks
- Customizable text and transitions
- Export in different aspect ratios for Instagram, YouTube, or mobile
How to use:
- Choose a template or start from scratch.
- Add your photos and videos by dragging them into the media library.
- Edit and enhance your media using the built-in tools, such as cropping, filters, and text overlays.
- Select a song from the music library or upload your own.
- Customize the timing of each slide to match the beat of the music.
- Preview and make any final adjustments before exporting your video in your desired resolution.
2. Adobe Express (Formerly Spark)
This online suite lets you create polished slideshows with eye-catching motion and royalty-free music.
- Quick syncing with Mac photo libraries
- Auto-resizing for social platforms
- Free and paid versions
How to Use Adobe Express
- Start by signing in to Adobe Express using your Adobe account, Google, or Facebook credentials.
- Select the “Slideshow” option from the available project templates.
- Upload your photos and videos directly from your device or link your cloud storage accounts for easy access.
- Drag and drop your media files into the timeline and rearrange them as needed.
- Add text, adjust fonts, and use the selection of themes for a tailored look.
- Select a track from Adobe Express’s royalty-free music library, or upload your own audio file.
- Adjust timing for slides and transitions to match the music and enhance flow.
- Preview your slideshow and make any necessary changes to transitions, visuals, or audio.
- Choose the output format and resolution based on your desired platform, then export or share directly online.
3. FotoMagico
A powerhouse desktop app for pros or enthusiasts who crave unlimited customization.
- Multi-layer timelines for syncing audio and images
- Effects like overlays, masks, and custom animations
- Advanced export settings for 4K or professional use
How to Use FotoMagico
Using FotoMagico to create stunning slideshows is intuitive yet powerful. Here’s a step-by-step guide:
- Start a New Project: Open FotoMagico and select “New Slideshow” to begin. Choose a template or start with a blank canvas for full creative control.
- Import Your Media: Drag and drop your photos, videos, and audio files into the workspace. You can organize and arrange them on the timeline for easy editing.
- Customize with Effects: Enhance your slideshow with layers, animations, and transitions. Use masks and overlays to create depth and a professional touch.
- Sync Audio with Precision: Add music or narration and align it to the visual elements using the multi-layer audio timeline for seamless synchronization.
- Preview and Fine-Tune: Regularly preview your slideshow to ensure smooth transitions and balanced audio. Tweak until the slideshow meets your expectations.
- Export and Share: Choose your desired output settings, such as 4K resolution for high-quality presentations. Export the slideshow and share it on your preferred platform or device.
With its advanced tools and creative possibilities, FotoMagico empowers users to craft truly captivating visual stories.
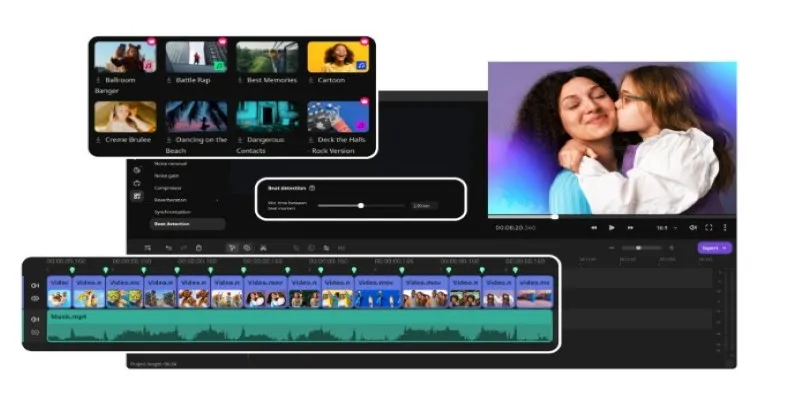
Adding and Syncing Music for the Best Impact
The right song sets the mood. Here’s how to add music like a pro:
- Use built-in options: Both Photos and iMovie come with free soundtracks.
- Import music files: Drag an MP3 or M4A into your project from Finder or your Music library.
- Trimming and fading: iMovie lets you cut songs to match your slideshow length. Fade in/out for smoother transitions.
- Royalty-free music: Want to share your slideshow online? Use royalty-free tracks from sites like bensound.com or the YouTube Audio Library to avoid copyright claims.
To line up key image changes with specific moments (like a laugh or chorus), adjust the duration of each slide or set markers in your editing timeline.
Export and Share Your Slideshow
Once you’re happy with your result, you’ll want to share or archive it. Here’s how:
- Export from Photos: Save as a .m4v video and choose your resolution.
- Export from iMovie: Select the File option and customize the quality and file type.
- Direct uploads: Share straight to platforms like YouTube, Facebook, or Vimeo.
- Airdrop or Email: For personal sharing, use Airdrop, Messages, or attach the video in an email.
Consider saving your finished video to external storage or cloud platforms for easy access later.
Tips for Faster, More Beautiful Slideshows

Want your slideshow to really stand out? Keep these tips in mind:
- Stick to a theme: Whether it’s “Summer 2025” or “Our Baby’s First Year,” themes give your slideshow focus.
- Don’t overload it: 20–30 photos per 3-minute song is a good rule. Edit out any that feel redundant.
- Tell a story: Arrange images in chronological order, or group them logically.
- Use high-quality snaps: Blurry or pixelated photos look worse in a slideshow than in a printed album.
- Test before sharing: Preview your project to check the flow, timing, and transitions.
Conclusion
Photo slideshows with music aren’t just for tech pros. Your Mac holds all the tools you need to design visually engaging stories that move your audience. With built-in apps like Photos and iMovie, plus affordable third-party options, you can craft professional-quality presentations in under an hour. If you want to add the finishing touch, experiment with different transitions, music combinations, and export settings.
On this page
Why Create a Photo Slideshow with Music Start with Apple Photos for the Easiest Slideshow Experience Level Up with iMovie for Advanced Slideshows Explore Third-Party Apps for Unique Styles and More Features Adding and Syncing Music for the Best Impact Export and Share Your Slideshow Tips for Faster, More Beautiful Slideshows ConclusionRelated Articles

The Simple Guide to Creating a Photo Slideshow with Picasa
Create a Slideshow Video from Photos and Music with Ease

How to Design Stunning Photo Collages with iPhoto on Mac and iPhone

Build and Share Stunning Slideshows on Your iPhone in Five Simple Steps
5 Best Xbox Converter Apps and Devices for Mac

How to Create a Jaw-Dropping Tumblr Slideshow in Minutes

5 Best Mac Screen Recording Tools to Elevate Your Recording Game

Step-by-Step Guide to Creating Canva Slideshows with Audio

Top FTP Software for Mac Users: Free and Reliable Options

How to Play RMVB with RMVB Player or Convert RMVB to MP4 for Playback on Mac

Free Prezi Slideshow Creation Made Simple: Start to Finish Tutorial

5 Best Tools to Make Instagram Slideshow Videos Effortlessly
Popular Articles

The Best Free Small Business Software in 2025 to Run Smarter, Not Harder

Simple Steps to Show Estimated Reading Time in WordPress Posts

The Best Calendar Apps for Windows in 2025: Stay Organized and On Track

Zoom Whiteboard Explained: Features, How to Use It, and Alternatives

Easy Ways to Convert Video on Windows and Mac for Free

5 Easy Ways to Repair Corrupted PDF Files Online for Free

The Ultimate Guide to Blurring Your Background on Zoom

Best Animation Software for Creative Work in 2025

Best Workflow Automation Tools for Business Efficiency

TickTick vs. Todoist: Which To-Do List App Should You Choose
