mww2
mww2
Make a Prezi Slideshow for Free in Minutes: No Payment Needed
Are you tired of the monotonous slide-after-slide presentations? Prezi offers a refreshing change. Unlike traditional slideshows, Prezi takes your audience on a dynamic journey through your ideas by zooming around your content. Whether you’re preparing for school, work, or just exploring new presentation styles, Prezi provides a free, flexible option. This tutorial will guide you through the process—no payments, no steep learning curve, just straightforward steps that deliver results.
Create a Free Prezi Account
To get started, visit Prezi.com and click on the “Get Started” or “Sign Up” button. While Prezi offers paid plans, you can use it for free with some limitations, which are sufficient for creating a polished slideshow.
Choose the “Basic” plan, which is clearly marked as free. You’ll need to enter your name, email, and password, or sign up using Google or Facebook. Once registered, confirm your email if prompted.
The free account allows you to create public presentations, use existing templates, and access basic design tools. Your projects are stored online, so you can access them anywhere as long as you’re logged in. There’s no need to install additional software unless you prefer the desktop version.
Choose the Right Prezi Format

Prezi offers three main tools:
- Prezi Present – Ideal for presentations shown to an audience, such as in classrooms, meetings, or pitches.
- Prezi Video – Converts your slides into a video where you appear alongside your content, perfect for remote teaching or virtual updates.
- Prezi Design – Helps you create infographics, charts, and reports, focusing more on visuals than storytelling.
For a classic slideshow with zoom effects, choose Prezi Present.
Once inside Prezi Present, you’ll be prompted to select a template. Prezi offers dozens of free templates categorized by purpose: education, business, marketing, etc. Don’t overthink this step—choose one that aligns with your topic. You can customize the text, colors, and layout later.
Select your template, then click “Use this template.” You are now in the editor.
Build Your Prezi Slideshow Step-by-Step
Unlike PowerPoint, Prezi is like working on a zoomable canvas. Think of it as a map with stops along the way.
Here’s how to build your slideshow from start to finish:
Edit the Title and Main Frame
At the center of every Prezi is a main idea. Click on the large text area in the middle and add your presentation title. This is typically your starting point.
Understand the Path
On the left side, there’s a panel showing your “path.” This is the order in which Prezi will zoom through your content. Each frame in the path is like a mini-slide. You can click and drag them to reorder if needed.
Customize Each Frame
Click on a frame (circle, square, etc.) and edit the text inside. Double-click to zoom into it and add more content: subheadings, paragraphs, images, icons, or videos.
To add content:
- Click Insert from the top menu.
- Choose Text, Image, Video, Chart, or even PDF.
- You can upload files or paste image URLs.
To change how things look:
- Click an item, then use the top toolbar to change the font, size, and color.
- Use the circular rotation handle to spin items.
- Drag edges to resize.
Add New Frames
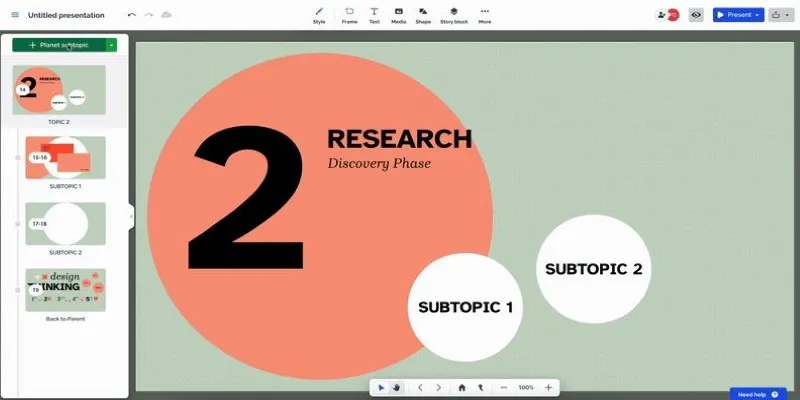
If you want more frames than the template provides, click the plus icon at the bottom of the left path panel. You’ll see options like “Planet + Subtopics,” “Stack,” or “Slide.” Select one, then position it anywhere on the canvas.
- Planet : Adds a frame with clickable subtopics that appear around it.
- Stack : Frames that zoom in vertically.
- Slide : Works more like a traditional slide.
Use “Planet” for non-linear presentations. Use “Slide” if your topic follows a straight path.
Move and Zoom
Click and drag any frame to reposition it on the canvas. Use your mouse scroll or the zoom buttons in the bottom right to zoom in or out.
This movement is what gives Prezi its dynamic feel. When presenting, the camera zooms in and out between frames, making the presentation feel like a journey.
Preview Your Prezi
At any point, hit the Present button in the top right. This plays the entire Prezi from the beginning. Use the arrow keys or click to move forward. This is how your audience will experience it.
Save and Share Your Prezi
Prezi autosaves your work constantly, so there’s no save button required. Once you’re finished, return to the dashboard by clicking the Prezi logo at the top left.
Your Prezi will now appear in your library. From here:
- Click the three dots on the Prezi thumbnail.
- Choose Share to get a view link or invite someone by email.
- If you want to present live, you can do so from the editor or dashboard by clicking Present Remotely.
- To download it for offline use, you’ll need a paid plan. However, the free online version is sufficient for most cases.
Note: With a free account, all Prezis are public. Anyone with the link can view it, and others can discover it if it’s searchable. If privacy is a concern, avoid personal info or upgrade to a paid plan for private sharing.
Conclusion
Prezi offers a more engaging, animated way to present your ideas—without spending a penny. Once you create a free account, choose the right format, and follow the zoom-based editor, building a presentation becomes a creative process rather than clicking through slides. Just ensure you select a suitable starting template, use zooms effectively, and review your flow before sharing. You don’t need specialized software or design skills to create something that feels sharp and unique.
Related Articles

5 Best Tools to Make Instagram Slideshow Videos Effortlessly

A Beginner’s Guide to Wondershare DVD Slideshow Builder Deluxe

Simple Methods to Convert VOB to WMV for Beginners

Top 5 Free After Effects Slideshow Templates You Need to Try

Step-by-Step Guide to Creating Canva Slideshows with Audio
Step-by-Step Guide to Creating Canva Slideshows with Audio

Create Engaging Video Presentations Without Using PowerPoint

Mastering Green Screen Effects with Windows Movie Maker

Add Magic to Your Videos with These 10 Movie Maker Effects
How to Use Kizoa Online Video Maker: A Complete Beginner's Guide

7 Best Online Tools to Create Picture and Video Collages

How to Use iMovie Themes to Make Your Videos Stand Out
Popular Articles

MPG to DivX Conversion Made Simple: Best Tools for Every Platform

Converting WMV to MOV on Mac Made Simple: Top 5 Solutions

Splice Video Editor: Fast, Simple Editing for Creators on the Go

Best Color Pairing Sites for Design Beginners
The Benefits of A/B Testing: Top 5 Tools to Boost Your eCommerce Strategy

What is the Hello Dolly WordPress Plugin: A Guide for Beginners

Simple Ways to Combine WMV Videos Without Losing Quality

Best Linux Distributions for Customization and Speed in 2025

Monetize Your Discord with Subscriptions & Shops

Convert Videos for Pocket PC Easily Using Free Video Converters
Bringing Old Footage Back to Life: A Video Remastering Guide