How to Reference Exact Sentences in Your WordPress Content
Linking specific paragraphs within your WordPress posts can significantly improve navigation and user experience. This guide will walk you through the process step by step, making it easy to create internal links that direct readers to precise sections of your content. Enhance accessibility and streamline information delivery with this straightforward tutorial.
Step 1: Switch to HTML (Text) Mode

To connect to a particular paragraph, you will need to set up special IDs on your content. These options aren’t available through the visual editor, so begin by going to the Text (HTML) mode.
How to Do It?
- Find the three dots at the top right corner in the WordPress editor. This provides additional settings.
- In the dropdown, click Code Editor or Text Mode (the text might vary depending on your software). The switch will move your code from the visual editor to plain text format.
- Once in text mode, you will see all the code in your post, which allows you to modify it directly, add elements, or resolve formatting issues.
Step 2: Add an ID to the Target Paragraph
Assign an id attribute to the paragraph or section you want to link to.
Example:
Let’s say this is the paragraph you want to target:
<p id="features">This section covers the main features of the product.</p>
Here, id="features" is the anchor identifier. Ensure the ID is:
- Unique (not repeated elsewhere in the post)
- Free of spaces (use hyphens if needed)
- Relevant to the content it marks
Step 3: Create the Anchor Link
Now that your paragraph has a unique ID, you can create a hyperlink to it from anywhere within your post—or even from another post or page.
Internal Link Example (within the same post):
<a href="#features">Jump to Features</a>
This will scroll the page down to the paragraph with the ID “features” when clicked.
External Link Example (from another post or page):
<a href="https://example.com/post-title/#features">Jump to Features</a>
Replace example.com/post-title/ with the actual URL of your post. Ensure to include the hash (#) before the ID.
Step 4: Test the Link
After adding your anchor links:
- Save or update the post.
- Preview it.
- Click the link to ensure it scrolls to the correct section.
If the page doesn’t scroll to the intended spot, double-check the ID spelling and ensure there are no typos in the link.
Step 5: Use WordPress Block Editor (Gutenberg) Method
If using the Gutenberg block editor, adding IDs is even easier. You don’t need to switch to HTML manually.
How to Add ID Using Gutenberg:
- Select the block you want to work with, such as a paragraph or heading.
- In the right-hand sidebar, under Advanced settings, locate the HTML Anchor field.
- Type in your desired anchor ID (e.g., features). Use only lowercase letters, numbers, or hyphens.
Gutenberg will automatically apply the ID to that block.
Linking to It:
Use #features in your links as described earlier.
Step 6: Style Anchor Links (Optional)
For better visibility or design consistency, style your anchor links.
CSS Example:
a[href^="#"] {
  color: #1e73be;
  text-decoration: underline;
}
To add custom CSS:
- Go to Appearance > Customize > Additional CSS
- Paste the code above and publish.
This ensures all internal anchor links have a consistent look.
Step 7: Link to Multiple Paragraphs
Repeat the process for multiple sections within the same post. Ensure each ID is unique.
Example:
<p id="features">Product features go here.</p>
<p id="pricing">Pricing details go here.</p>
<p id="reviews">Customer reviews go here.</p>
This creates a mini table of contents within the post.
Step 8: Use Plugins (Optional)
If editing HTML isn’t comfortable, WordPress has plugins that handle anchor links efficiently.
Popular Plugins:
- Easy Table of Contents
- LuckyWP Table of Contents
- Page Scroll to ID
These plugins allow you to:
- Automatically generate anchor links for headings
- Style your anchor links without coding
- Enable smooth scrolling animations
To install:
- Go to Plugins > Add New
- Search for the plugin name
- Click Install Now, then Activate
Step 9: Enable Smooth Scrolling (Optional but Recommended)
Smooth scrolling provides a better user experience when navigating via anchor links.
How to Enable:
Add the following JavaScript code to your theme’s footer or use a plugin for custom scripts.
<script>
document.querySelectorAll('a[href^="#"]').forEach(anchor => {
  anchor.addEventListener('click', function(e) {
    e.preventDefault();
    document.querySelector(this.getAttribute('href')).scrollIntoView({
      behavior: 'smooth'
    });
  });
});
</script>
This applies smooth scrolling to all internal anchor links.
Step 10: Maintain Anchor Links Over Time
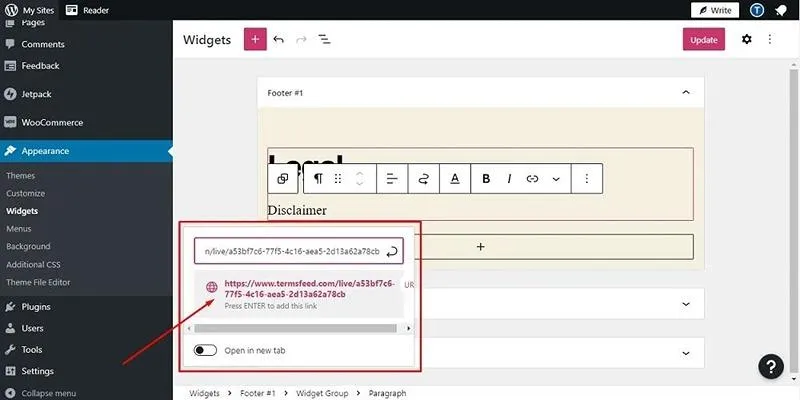
If updating your post or deleting sections, review the following:
- Update or remove outdated anchor links.
- Reassign IDs if paragraph content changes.
- Test all links after publishing edits.
Neglecting these steps can result in broken links, frustrating users and impacting SEO. Regular checks ensure a smooth, user-friendly experience and protect your website’s performance.
Why Link to Specific Paragraphs?
Understanding the why behind linking to specific paragraphs is crucial.
- Improves Navigation: Readers can quickly jump to the part they’re most interested in.
- Boosts SEO: Search engines recognize anchor links and may display them as jump links in search results.
- Enhances User Experience: Especially on mobile, direct links save time.
Conclusion
Linking to specific paragraphs in WordPress posts is a powerful yet simple way to improve content accessibility and usability. Whether you’re managing a personal blog, a tutorial site, or a professional portfolio, internal anchor links can significantly elevate the reader’s experience.
On this page
Step 1: Switch to HTML (Text) Mode Step 2: Add an ID to the Target Paragraph Step 3: Create the Anchor Link Step 4: Test the Link Step 5: Use WordPress Block Editor (Gutenberg) Method Step 6: Style Anchor Links (Optional) Step 7: Link to Multiple Paragraphs Step 8: Use Plugins (Optional) Step 9: Enable Smooth Scrolling (Optional but Recommended) Step 10: Maintain Anchor Links Over Time Why Link to Specific Paragraphs? ConclusionRelated Articles

Elevate Your Strategy with the Best Content Marketing Tools of 2025

The 8 Best Content Marketing Tools in 2025 to Elevate Your Strategy

Enable PHP in WordPress Posts and Pages Easily

A Step-by-Step Guide to Adding Google Authenticator 2FA to WordPress

7 Best WordPress Help Desk Plugins for Superior Customer Support
The Ultimate Guide: 16 Best Plugins to Improve WordPress Comments (2025)
The Ultimate Guide to the 10 Best WordPress Admin Dashboard Plugins

Best Free Slideshow Plugins for WordPress in 2025

How to Add a Private Messaging System in WordPress: A Step-By-Step Guide

How to Move Comments Between WordPress Posts: A Quick and Easy Guide

8 Must-Have Productivity Tools Every Software Engineering Manager Needs

7 Best Vlog Recorders for Captivating Videos: A Beginner's Guide
Popular Articles

10 Effective Ways to Prevent Spam Registrations on Your WordPress Membership Site

10 Reddit Automation Ideas You Need to Try in 2025

Top 5 AMV Editing Software for Smooth and Professional Videos

The Best Webinar Software for Marketers in 2025 to Grow Your Audience and ROI

Step-by-Step Guide on Splitting a Clip in Final Cut Pro
Best Free Tools to Convert MPG to MPEG Effortlessly

Upgrade Your Videos: 7 Smart AI Enhancers

Best Free Methods to Convert AVI to MP4 Format for Your Kindle Fire
AI Highlight Video Makers: Top 3 Tools to Capture Best Moments

GIF to WebM Conversion Made Easy: A Guide for PC and Mac Users

The Simple Way to Get iMovie on Mac—and What to Use on Windows

 mww2
mww2