mww2
mww2
How to Stabilize a Video in Premiere Pro Without Losing Quality
It’s frustrating to review footage you carefully shot only to find it shaky and uneven. Even with high-end gear, handheld shots often come out with unwanted movement—especially during motion or zoom. Luckily, Adobe Premiere Pro includes a built-in solution: video stabilization. You won’t need third- party tools or extra gear—just some patience and a clear process.
In this guide, you’ll learn how to stabilize a video in Premiere Pro using its native Warp Stabilizer effect. Whether you’re just starting or have some editing experience, this walkthrough will help you achieve smoother, more polished results without feeling overwhelmed.
Understanding the Warp Stabilizer in Premiere Pro
The core tool for stabilizing video in Premiere Pro is the Warp Stabilizer. It’s not tucked away in a complex menu—it’s right there in the Effects panel. Warp Stabilizer analyzes your footage frame by frame to identify and reduce unwanted movement. It doesn’t magically smooth everything, but when used correctly, it can drastically improve the watchability of shaky clips.
To start, drag your clip into the timeline. Then, head over to the Effects panel and search for “Warp Stabilizer.” Once found, drag it onto the clip. Instantly, Premiere Pro starts analyzing the video in the background. Depending on your system’s speed and the clip length, this part can take a while, but don’t rush it—it’s the backbone of the stabilization process.
Once the analysis is complete, Premiere uses a default stabilization preset. If you play your clip at this point, it likely already looks improved. But there’s more to it. Learning and adjusting the settings can turn good results into outstanding ones.
Note: Warp Stabilizer doesn’t work on nested sequences or clips with time remapping unless you pre-render or nest them correctly. So, if you get error messages, double-check those details.
Adjusting Settings for the Best Stabilization Results
Default settings don’t always deliver the look you want. Sometimes, the stabilization goes too far, warping the image too much or causing weird distortions. Other times, it might not go far enough. Understanding the key settings helps you make precise adjustments.
First, look at Smoothness. This controls how much movement the effect tries to remove. The default is 50%, which works for most situations, but you can adjust it up or down. Lower values keep more natural motion, while higher ones aim for almost locked-in-place footage.
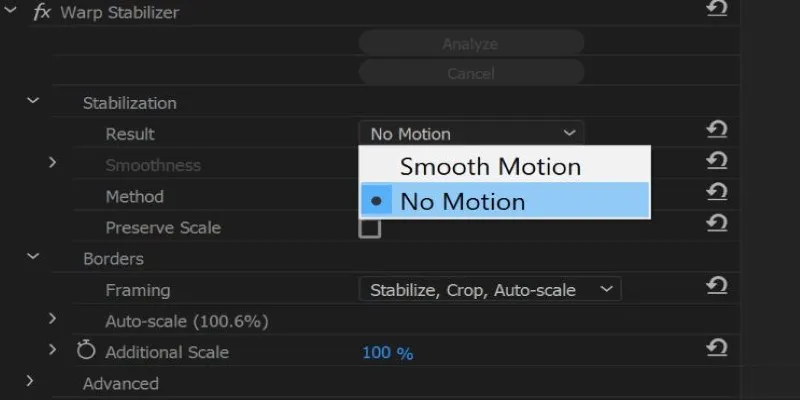
Then there’s the Result option, which gives you two main choices: “Smooth Motion” and “No Motion.” Smooth Motion tries to stabilize while keeping some of the original camera movement intact, which works well for walk-and-talk scenes or handheld shots. “No Motion” locks the frame completely, ideal for static shots that were accidentally handheld but meant to look tripod-like.
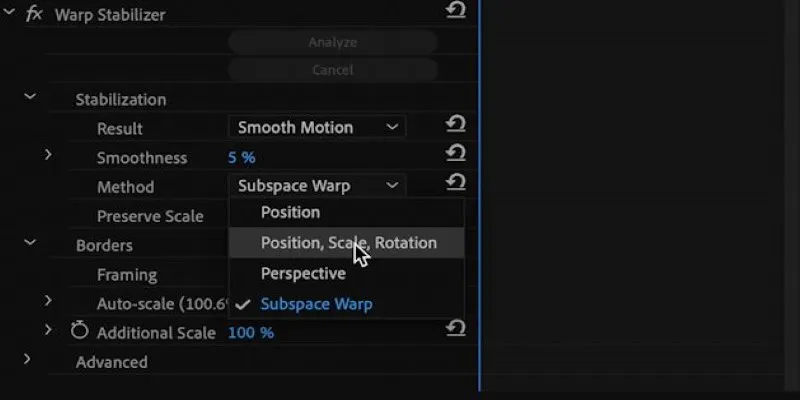
Another critical setting is Method. You’ll find options like Subspace Warp, Position, Position/Scale/Rotation, and Perspective. Subspace Warp is the most aggressive and tries to warp parts of the frame to compensate for movement—it can work wonders but also introduces strange visual artifacts if overused. The simpler methods, like Position, are more conservative and often look more natural, especially if the shake is minor.
Also, pay attention to Borders. Stabilization inevitably results in some cropping because the effect shifts and zooms into the frame to cover movements. If you notice black edges flickering at the sides of your frame, turn on Framing: Stabilize, Crop, Auto-scale. Premiere will automatically zoom in just enough to eliminate edges, keeping things tidy. You can also set it to “Stabilize Only” if you want to handle the scaling yourself.
The sweet spot varies for every clip, so take the time to preview, tweak, and reanalyze if necessary. With practice, you’ll get faster at this.
Tips for Fixing Common Stabilization Issues
Not every clip plays nice with Warp Stabilizer. Sometimes, you stabilize your footage and end up with jelly-like distortions or a warped background that looks more distracting than the original shake. There are a few reasons this happens—and a few fixes you can try.
If your footage has a lot of motion blur or fast camera movement, Warp Stabilizer might misinterpret those as shakes. Reducing smoothness and changing the Method can help. Try switching from Subspace Warp to Position/Scale/Rotation or even just Position to see if it calms things down.
Footage with motion in the foreground and background moving at different speeds—like someone walking past a moving car—can also confuse the effect. In these cases, the stabilizer might warp parts of the image that shouldn’t move. Again, using simpler methods reduces distortion.
Sometimes, the problem is the clip itself. If the shake is too extreme—like footage from a running camera—it might be beyond the scope of Warp Stabilizer. In those situations, cutting the clip into smaller sections and applying different stabilization settings to each part can work better than treating it as a single unit.
And always keep an eye on the final crop. The more stabilization Premiere applies, the more it has to zoom in. If the crop becomes too severe and degrades quality, you might want to manually scale it to a less aggressive level, even if it means accepting a bit of shake.
Lastly, if you plan to stabilize a lot of clips, try to do this step early in the editing process before adding transitions or effects. Warp Stabilizer doesn’t always play nice with other effects, and stabilizing early avoids reprocessing later.
Conclusion
Stabilizing shaky footage in Premiere Pro doesn’t have to be complicated. With the Warp Stabilizer effect and a few simple adjustments, you can turn distracting clips into smooth, professional-looking videos. The key is understanding how each setting impacts your footage and taking the time to fine-tune it. Whether you’re fixing a quick handheld shot or cleaning up an entire sequence, Premiere Pro gives you the tools to make it look right. A little patience goes a long way, and once you get the hang of it, the process becomes second nature.
Related Articles

PowerPoint Image Compression: Reduce File Size Without Sacrificing Clarity

Step-by-Step Guide to Fix MXF Files Not Playing on Premiere Pro

LightCut 2025 Review: The Best Video Editor for Android and iPhone
Best Tools: 4 Video Players for Frame-by-Frame Analysis

How to Change Video Frame Rate: 5 Best FPS Converters

Effortless Steps to Convert and Upscale Video to 4K Resolution
Fix Low-Quality Videos Fast: 3 Best AI Upscalers (2025)

Choosing the Right 4K Video Upscaler: Top Five Picks

Upgrade Your Videos: 7 Smart AI Enhancers

Make Any Video Compatible with a Reliable Video Converter

The Art of Editing: Building Engaging Video Montages

AVCLabs Video Enhancer AI: Is It Really Worth Your Trial?
Popular Articles
Step-by-Step Guide to Reversing Videos on Android Easily

Unlocking Efficiency: Your Ultimate Guide for GIS Mapping in Asset Management
Mastering the Split Screen Effect in iMovie: A Beginner’s Guide

The 4 Best AI Website Builders for Effortless Website Creation
Top Desktop Apps for Smooth Slow and Fast Motion Effects

Discover the 4 Best Journal Apps in 2025 to Boost Your Writing Routine

Which Are The Best Database-Powered App Builders for Seamless Development?

The 15 Best Lead Management Software and Tools to Boost Your Business in 2025

Best Tools to Convert Video Formats: Top 5 Transcoders You Need

How to Easily Open a DAT File on Windows and Mac

Top Ways to Record Skype Video Calls on Windows and Mac