mww2
mww2
Top 3 Tools to Create Bootable USB Drives Easily in Just a Few Steps
Creating a bootable USB drive is now a common method for fixing or installing operating systems. Whether you are repairing a broken computer, testing a new Linux distribution, or reinstalling Windows, a bootable USB can save you significant time and effort.
Unlike the past reliance on DVDs for OS installation, today’s computers prefer USB drives. With the right tool and an ISO file, you can easily transform any USB into a powerful boot device. This post introduces three of the best free tools anyone can use to create bootable USB drives.
Why Create a Bootable USB Drive?
Bootable USB drives are invaluable not only for installations but also for fixing problems and maintaining computers, especially in emergencies.
Common Reasons to Create a Bootable USB:
- To install a fresh version of Windows, Linux, or macOS
- To repair or troubleshoot a damaged system
- To try a new operating system without full installation
- To create recovery tools for virus removal or data backup
Using a bootable USB is not only efficient but also reusable. You can reformat and use the same USB stick for different systems and tools over time.
Tool #1: Rufus
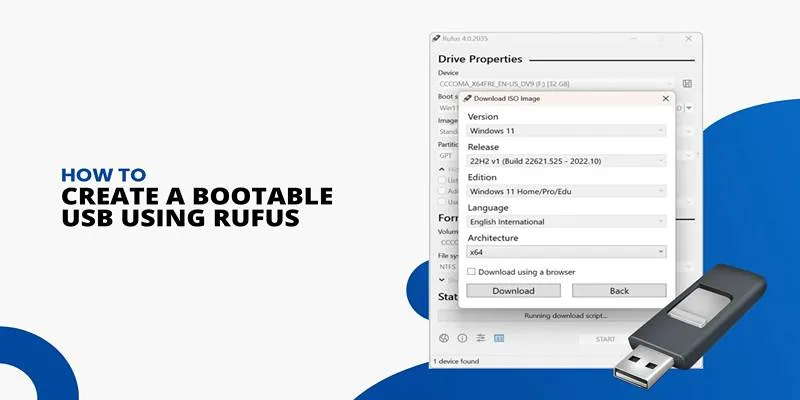
Rufus is widely recognized as one of the most efficient bootable USB creators for Windows users. It stands out due to its small file size, speed, and reliable performance.
Why Rufus is a Top Choice
Rufus is a portable application, meaning you can run it without installing anything. It is perfect for quickly creating bootable USB drives without complex settings. Although it is only available for Windows, it supports ISO files for both Windows and Linux operating systems. Rufus is particularly helpful when creating bootable USBs for older systems, as it supports both BIOS and UEFI boot types.
Main Features:
- No installation required (portable)
- Extremely fast USB formatting and writing
- Supports multiple file systems (FAT32, NTFS, UDF, exFAT)
- Compatible with Windows and Linux ISOs
- Offers support for UEFI and legacy BIOS systems
Steps to Use Rufus:
- Download Rufus from the official website.
- Plug in a USB drive (8 GB or more recommended).
- Open Rufus and select the USB from the device list.
- Click “Select” to choose the ISO file.
- Choose the partition scheme (usually GPT for UEFI).
- Click “Start” and wait for the process to complete.
For Windows users seeking simplicity and power, Rufus is an excellent choice.
Tool #2: BalenaEtcher
BalenaEtcher is a cross-platform USB boot software known for its beautiful interface and simplicity. It is designed to be beginner-friendly, making it a favorite for users on Windows, macOS, and Linux.
What Makes BalenaEtcher Stand Out?
BalenaEtcher minimizes errors by allowing only external drives to be selected, preventing accidental overwriting of internal system drives. It supports a wide range of image formats, including ISO and IMG files. While it doesn’t offer advanced features like partition scheme settings, it excels in ease of use. Even those new to bootable USB creation can complete the process in a few clicks.
Key Features:
- Works on Windows, macOS, and Linux
- Clean and minimal user interface
- Prevents accidental overwriting of system disks
- Supports multiple image formats (ISO, IMG, ZIP)
- Ideal for flashing operating systems to SD cards and USB drives
Steps to Use BalenaEtcher:
- Download and install BalenaEtcher from the official site.
- Open the application and click “Flash from file.”
- Select the ISO or IMG file to be used.
- Insert and choose the target USB device.
- Click “Flash” and allow the software to write the image.
BalenaEtcher is ideal for those who value simplicity and cross-platform flexibility.
Tool #3: UNetbootin
UNetbootin is a free and open-source tool built with Linux users in mind but works across all major operating systems. What sets it apart is the ability to directly download popular Linux distributions within the software itself.
Why UNetbootin is a Good Option
Unlike Rufus or Etcher, UNetbootin gives more control to users. It supports persistent storage, allowing Linux users to save changes made during a live session. While its interface may seem a bit outdated, the functionality it offers is extremely useful—especially for tech enthusiasts. UNetbootin is especially helpful for creating Linux live USBs with options for customization and advanced settings.
Key Features:
- Multi-platform (Windows, Linux, macOS)
- Can download and install Linux distros directly
- Offers persistent storage support
- No installation required (portable)
- Compatible with FAT32 file systems
Steps to Use UNetbootin:
- Download the software for the appropriate platform.
- Launch the tool (no installation needed).
- Select a distribution to download or upload a local ISO.
- Plug in the USB and select it as the destination.
- Click “OK” and wait for the process to finish.
Though it’s more Linux-focused, UNetbootin remains a solid option for users looking for flexibility.
Tips Before Getting Started
Creating a bootable USB is simple, but a few preparations can make the process smoother and prevent errors:
- Backup your USB : All data will be erased during the process.
- Use a USB with at least 8 GB capacity : Some OS images are large.
- Download ISO files from official sources : Avoid third-party downloads.
- Double-check the selected drive : Choosing the wrong device may result in data loss.
Conclusion
A bootable USB drive is a must-have tool for anyone who wants control over their computer setup. Whether installing a new operating system, repairing an old one, or exploring Linux distributions, these tools make the process stress-free. With Rufus, BalenaEtcher, and UNetbootin, users have reliable, free options for creating bootable USB drives in just a few steps. Each tool caters to different needs, but all deliver the same result—a ready-to-boot USB stick that can restore or upgrade a system in no time. For tech-savvy users and beginners alike, mastering these tools adds one more skill to the personal IT toolkit.
Related Articles

Discover the Top Password Managers to Keep Your Accounts Secure

Best Screen Sharing Software for Remote Teams in 2025: A Comprehensive Guide

The Best Dictation Software: Transforming How You Work and Communicate

Discover the 6 Best Employee Management Software and Apps for 2025
Free API Testing Tools That Help Developers Test and Debug Fast
Safe and Secure: Free Antivirus Solutions for Daily Web Protection
Create Stunning Videos with These 5 Free Editors for Absolute Beginners
Kernel Video Repair Review: Everything You Need to Know
Top 3D Model Converters to Change STL Files into OBJ Format Fast
JSON to CSV Conversion Made Easy: Tools Every Analyst Should Try
Export SQL Query Results to Excel with These Free Online Tools

Choosing the Best Accounting Software for Small Business: A Complete Guide
Popular Articles

Explore the Latest Upgrades in Ubuntu Touch OTA-8

Step-by-Step Guide to Recording HD Videos to DVD for Big Screen Viewing

How to Convert MXF to Final Cut Pro X: Simple and Effective Solutions

Boost Your Image Resolution: 5 Best AI Upscaling Apps
Smooth Slow Motion Editors: Top Tools for Phone and Computer

9 Free Tools to Speed Up a Video Online (No Downloads Needed)

Top Markdown Editors for Mac-Based Workflows
Simple Ways to Resolve Audio Video Delay: A Beginner’s Guide
Restoring Your WordPress Database to Default State
Best Tools to Convert MP4 to SWF Quickly and Effectively

The Best Flowchart Software and Diagram Tools in 2025: A Comprehensive Guide