mww2
mww2
VLC Not Recording? Here's How to Fix It Fast
VLC Media Player is a popular choice for watching videos and streaming content. It also offers a handy screen and media recording feature. Ideally, you just hit the red record button, and VLC starts saving what you’re playing. But if you’re here, it’s likely that didn’t happen—maybe the recording won’t start, nothing saves, or the saved file is empty.
This issue frustrates many users and can occur on both Windows and Mac. It might be caused by incorrect settings, permission issues, or VLC bugs. The good news? You don’t have to be a tech expert to fix it. This guide will walk you through clear, step-by-step solutions to resolve the “VLC not recording” problem.
How to Solve VLC Not Recording?
Check Where VLC Saves Recordings
Before delving deeper, ensure the recordings aren’t being saved in an unexpected location.
- Default location on Windows:
C:\Users\[YourName]\Videos - Default location on macOS:
~/Movies
To check or change the folder:
- Open VLC.
- Go to Tools > Preferences (or VLC > Preferences on Mac).
- Click on the Input / Codecs tab.
- Look for the Record directory or filename field.
- Set a new folder path you can easily find and access.
Try recording again and check that folder.
Update VLC Media Player
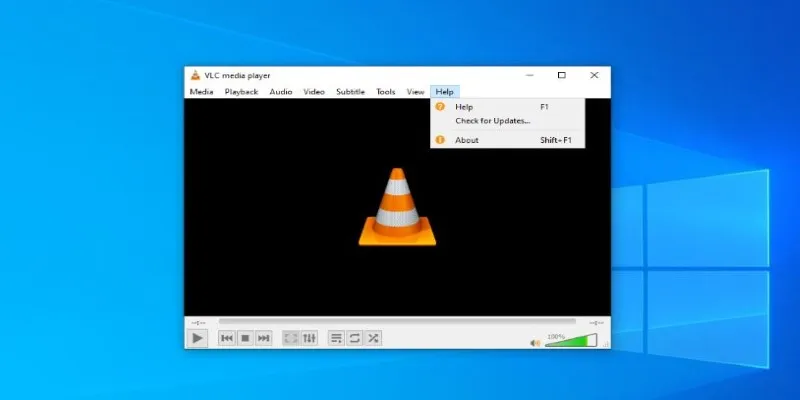
Sometimes, the problem lies with the VLC version you’re using. Bugs in older versions can affect the recording function.
- Open VLC and go to Help > Check for Updates.
- If an update is available, download and install it.
- Restart VLC and test the recording feature.
Run VLC as Administrator (Windows only)
A lack of permissions can stop VLC from writing to the disk.
To run VLC as administrator:
- Close VLC if it’s open.
- Right-click the VLC shortcut.
- Select Run as administrator.
- Try recording again.
To make VLC always run as admin:
- Right-click the VLC shortcut.
- Choose Properties > Compatibility tab.
- Check Run this program as an administrator.
Enable the Recording Button in the Interface
Sometimes, users think recording is broken when they haven’t enabled the recording button.
To show the record button:
- Open VLC.
- Go to View > Advanced Controls.
- You’ll now see a small red circle on the interface—the record button.
Play something, then hit the red circle to start and stop recording. Check your save folder for the output file.
Check File Format and Codec Settings
VLC sometimes struggles with certain file types or codecs. You might be trying to record a format it can’t handle properly.
Try this:
- Go to Tools > Preferences > Input / Codecs.
- Set Hardware-accelerated decoding to Disable.
- Scroll down to the Record directory or filename and choose a simple location like Desktop.
- Go to the Video tab and ensure the Enable Video checkbox is ticked.
- Under Output, choose Automatic or DirectX (DirectDraw) if on Windows.
Click Save, then restart VLC and try again.
Use the Convert/Save Feature as an Alternative
If the regular record button isn’t working, try this workaround:
- Go to Media > Convert / Save.
- Click Add, and select the file or stream.
- Click Convert / Save at the bottom.
- Under Settings, choose the format (MP4, AVI, etc.).
- Set a Destination file and click Start.
This method uses VLC’s transcoding feature, which works even when the record button fails.
Check Disk Permissions and Space
Ensure VLC has permission to write to the folder you’re recording. This can be an issue on Mac, especially with newer privacy rules.
On macOS:
- Go to System Settings > Privacy & Security > Files and Folders.
- Ensure VLC can access Desktop, Documents, or Downloads wherever you save files.
Also, confirm you have enough free space on the drive.
Reinstall VLC (Clean Install)
If none of the above worked, try a clean reinstall:
- Uninstall VLC from your system.
- Delete the preferences folder:
- Windows:
C:\Users\[YourName]\AppData\Roaming\vlc - Mac:
~/Library/Preferences/org.Videolan.vlc
- Windows:
- Download the latest version.
- Reinstall VLC and test recording again.
This will reset all your VLC settings and clear up any corrupted files.
Check VLC Logs for Errors
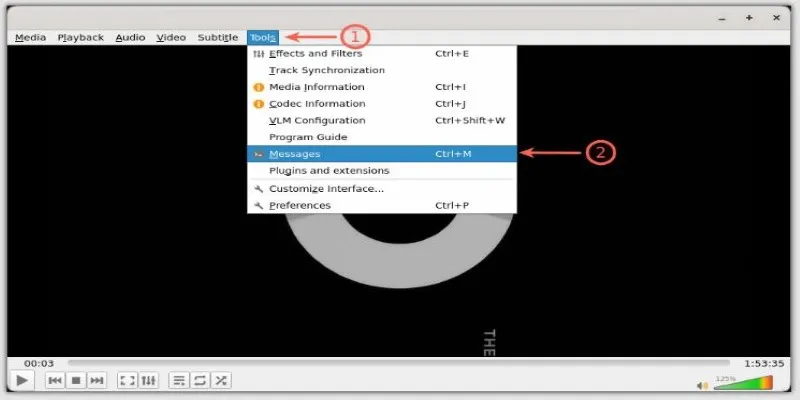
For advanced users, VLC logs can reveal what’s going wrong.
To access logs:
- Go to Tools > Messages.
- Set the Verbosity level to 2.
- Try to record something.
- Watch for any error messages that show up.
These logs can help pinpoint codec errors, write failures, or other internal issues.
Alternative Tools to Record Screen with Audio
OBS Studio (Windows, macOS, Linux)
OBS (Open Broadcaster Software) is a popular, free screen recording and streaming tool. It offers full control over resolution, frame rate, audio sources, and output formats.
- Records screen, webcam, and system audio
- Customizable layouts and hotkeys
- No watermarks or time limits
- Great for tutorials, gameplay, or long recordings
ShareX (Windows only)
ShareX is lightweight, open-source, and perfect for quick recordings or screenshots.
- Offers region or full-screen recording
- Can record as MP4 or animated GIF
- Built-in annotation, upload, and editing tools
- Works well for software demos or guides
QuickTime Player (macOS only)
Pre-installed on Mac, QuickTime Player includes a built-in screen recording tool.
- Simple interface with quick screen or window capture
- Allows voice-over using a mic
- No extra installations are required
- Best for casual or occasional recording needs
Conclusion
“VLC not recording” can be frustrating, but most causes are simple to fix—wrong settings, a missing record button, or permission issues. Go through each step calmly and methodically. Start by ensuring the recording is saved somewhere, then move on to updating VLC, tweaking codec settings, and checking permissions. If all else fails, remember VLC isn’t your only option. Plenty of free, reliable tools can handle recording better and with fewer hiccups. Take a little time to try the steps above; chances are VLC will save your media just fine again.
Related Articles

How to Fix Audio Delay in VLC Player
How to Resolve 'Your Connection Is Not Private' Errors Securely
Simple Ways to Resolve Audio Video Delay: A Beginner’s Guide
5 Ways to Convert Videos to MP4 on Mac OS X Effortlessly

Top 10 Video Players for Windows and Mac in 2025

Best Tools to Record Streaming Content on Chrome Browser
Simple Ways to Record a Teams Meeting: Built-in and Other Options

How to Record Your Gameplay on PC Like a Professional: Essential Tools & Tips for 2025

Easy Ways to Screen Record Snapchat Stories & Snaps
Easy Ways to Screen Record Snapchat Stories & Snaps
Top Apps and Tools to Record Clash Royale Gameplay Like a Pro

How to Record a Podcast on Zoom: A 6-Step Remote Guide
Popular Articles

Simple Steps to Show Estimated Reading Time in WordPress Posts

Top Dictation Software to Try in 2025 for Seamless Speech-to-Text Conversion

How to Convert MPEG to WAV: A Step-By-Step Guide

The 5 Best Habit Tracker Apps to Transform Your Life: A Guide

Perplexity Introduces Voice Mode for Seamless AI Interaction on macOS
How to Download and Use Windows Movie Maker on Windows 10

Easily Extract Key Data from Emails Using Parsio

Unlocking Efficiency: Your Ultimate Guide for GIS Mapping in Asset Management

Best CRM Software for the Education Industry: A Complete Guide
Simplest Methods to Convert AVI Files into XviD, SWF, or FLV Formats

Struggling to Upload Videos to Instagram? Try These 5 Quick Fixes