mww2
mww2
How to Use iMovie to Combine Video Clips in Minutes
Video production often begins by merging multiple clips into a cohesive sequence. For Apple Mac users, iMovie is the go-to editing platform. Its user- friendly interface is perfect for beginners, while its advanced features cater to more complex projects, whether for social media or corporate use. This guide provides detailed instructions to help you combine your videos effortlessly, minimizing frustration during the process.
Why Use iMovie to Combine Video Clips?

- User-Friendly Interface : iMovie’s intuitive drag-and-drop timeline and tools make video editing straightforward, even for novices.
- High-Quality Output : Supports 4K video resolution, enabling you to produce professional-quality projects.
- Free for Mac Users : iMovie is free to download from the App Store and is often pre-installed on Mac devices.
Step 1: Open iMovie and Create a New Project
Begin your editing journey by launching iMovie on your Mac. Here’s how to start:
- Open iMovie from your Applications folder or Dock.
- Click the “Create New” button on the homepage and select “Movie” to initiate a new project.
- Name your project to keep your workspace organized, especially if juggling multiple projects.
You’ll now see iMovie’s timeline, where you can start editing your masterpiece.
Step 2: Import Your Video Clips
Import the clips you wish to combine by following these steps:
- Click the Import Media button, represented by a downward-pointing arrow at the top-left corner.
- Locate your clips on your Mac, select them, and click Import Selected.
- Your clips will appear in the Media Library at the top of the iMovie interface.
If your clips are in various formats, convert them to iMovie-compatible formats like MP4 or MOV using tools like HandBrake.
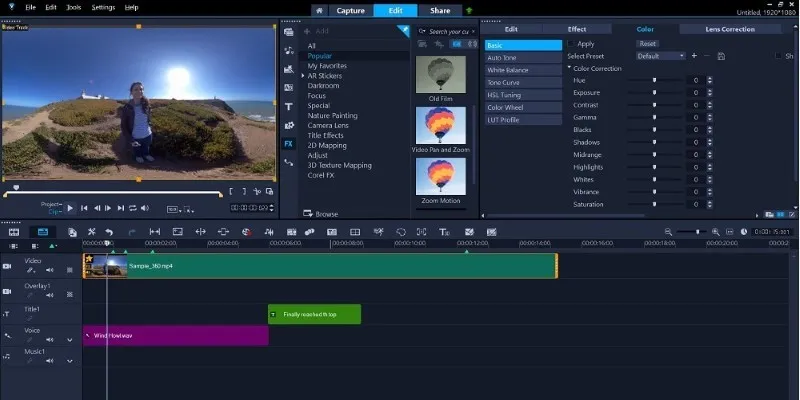
Step 3: Drag and Drop Clips into the Timeline
Now, it’s time to add your clips to the timeline:
- Drag each video clip from the Media Library down to the timeline at the bottom of the screen.
- Arrange the clips in your preferred order by simply dragging them.
This step allows you to visualize your project. Feel free to rearrange clips as needed.
Step 4: Trim the Clips for a Smooth Flow
Avoid choppy transitions and awkward clip endings by trimming:
- Hover your cursor over the start or end of a clip in the timeline.
- When the trim icon (a vertical line with arrows) appears, drag inward to cut unwanted footage.
Trimming helps remove pauses and ensures a smooth flow in your final video.
Step 5: Add Transitions Between Clips
Transitions create a seamless video flow. Here’s how to add them in iMovie:
- Click the Transitions tab above the Media Library.
- Select a transition style (e.g., Fade, Slide, Cube).
- Drag your chosen transition between two clips in the timeline.
Experiment with transitions to match your video’s tone:
- Use “Cross Dissolve” for a soft and professional look.
- Use “Slide” for a modern, stylish effect.
Step 6: Enhance Your Clips with Music and Effects
Enhance your video with music and effects:
- Click the Audio tab above the Media Library to access built-in soundtracks.
- Drag a selected soundtrack to the timeline below your clips.
- Adjust audio levels by clicking the soundbar at the bottom of the audio clip.
For effects like slow-motion or color correction:
- Select a clip in the timeline.
- Use the tools above the video preview window to apply effects like Adjust Color , Crop , or Speed.
Step 7: Review and Export Your Video
Once you’re done editing, review your project:
- Click the Play button above the timeline to preview your video.
- Make final adjustments, such as tweaking transitions or further trimming clips.
When satisfied, export your video:
- Click the Share button (a box with an upward-pointing arrow) in the top-right corner.
- Select File to save the video to your Mac.
- Choose your desired resolution and quality settings, then click Next to confirm.
Your combined video is now ready to share or upload!
Common Mistakes to Avoid While Combining Clips in iMovie
- Overusing Transitions : Too many effects can clutter your video. Stick to one or two styles for consistency.
- Skipping Trimming : Small pauses and shaky footage can disrupt your audience’s experience. Always tidy up your clips.
- Ignoring Aspect Ratio : Ensure all clips have consistent aspect ratios to maintain video quality.
- Not Adjusting Audio Levels : Consistent audio levels are crucial for a seamless viewing experience.
- Forgetting to Save Your Project : Regularly save your work to avoid losing progress.
Tips for Faster Workflow in iMovie

Enhance your editing efficiency with these tips:
- Utilize Keyboard Shortcuts like Command + Z to undo and Command + B to split a clip.
- Organize clips into folders on your Mac before importing.
- Leverage iMovie’s Themes for pre-designed templates.
- Duplicate clips to reuse them without multiple imports.
- Use the Speed tool for time-lapse or slow-motion effects.
Conclusion
Combining video clips doesn’t need to be daunting. With iMovie’s user-friendly interface and versatile features, creating a cohesive video is within reach. Whether for a school project, business presentation, or personal vlog, iMovie ensures a professional and polished final cut. Start experimenting with your clips today and discover what you can create.
On this page
Why Use iMovie to Combine Video Clips? Step 1: Open iMovie and Create a New Project Step 2: Import Your Video Clips Step 3: Drag and Drop Clips into the Timeline Step 4: Trim the Clips for a Smooth Flow Step 5: Add Transitions Between Clips Step 6: Enhance Your Clips with Music and Effects Step 7: Review and Export Your Video Common Mistakes to Avoid While Combining Clips in iMovie Tips for Faster Workflow in iMovie ConclusionRelated Articles

PowerPoint Image Compression: Reduce File Size Without Sacrificing Clarity

How to Easily Convert AVI to MOV Using 4 Reliable Tools

MPEG to MP3 Conversion Made Easy: A Complete Guide

How to Convert MPEG to WAV: A Step-By-Step Guide
How to Easily Convert AVI to MOV Using 4 Reliable Tools

From Video to Audio: 10 Top MP4 to MP3 Converters in 2025

Free Ways to Convert HEVC to MP4 Without Losing Quality

Top 3 Simple Ways to Convert WMA to MP4 Easily

Effortless Steps to Convert and Upscale Video to 4K Resolution

Easy Ways to Automatically Upload Zoom Recordings to Google Drive

Mastering iMovie: Quick, Clean Video Editing for Every Apple Device

From Excel to JPG: Best Tools for Converting Charts into Images
Popular Articles
Create a Slideshow Video from Photos and Music with Ease

5 Best Apps for Schedule Management That You Can't Ignore in 2025

Top MKV Players for Mac 2025: Best for Smooth 4K Playback

The Simple Guide to Creating a Photo Slideshow with Picasa

The Ultimate Guide to Website Builders: Wix, Squarespace, Shopify, and Beyond

Discover AI Chat and Dashboard Features in Home Assistant 2025.3
Make Your Own Music Videos: 8 Best Musically Makers

The 11 Best CRMs for Small Business: Streamline Your Workflow in 2025

Top 8 QuickTime Player Alternatives for Windows 10/8/7/XP

Best Markdown Converter Tools Bloggers Should Try for Easy Formatting