mww2
mww2
A Beginner's Guide to Green Screen Editing in Windows Movie Maker
Have you ever watched a movie scene with jaw-dropping special effects and wondered if you could create something similar? Good news! You don’t need a Hollywood studio budget to add green screen effects to your videos. Windows Movie Maker, a beginner-friendly video editing tool, offers a simple way to transform your storytelling with exciting visual effects. This blog will guide you step-by-step on how to master green screen effects using Windows Movie Maker.
What Is a Green Screen Effect?
Green screen, or chroma keying, is a video editing technique that allows you to replace the background of a video with an image or another video. A green background is often used because it contrasts sharply with skin tones and typical clothing colors, making it easier for editing software to isolate and remove the background.
For example:
- Replace a plain green background with an exotic beach for your travel vlog.
- Add dynamic sci-fi visuals for short films or fan-made videos.
- Overlay text or animations seamlessly in tutorial videos.
While professional-grade tools like Adobe Premiere Pro or Final Cut Pro dominate the editing industry, tools like Windows Movie Maker offer simpler solutions accessible to anyone.
Why Use Windows Movie Maker for Green Screen Effects?
Windows Movie Maker is known for its ease of use and beginner-friendly interface. While it doesn’t boast the advanced features of high-end editing software, it’s perfect for creating straightforward green screen effects without getting overwhelmed.
Key advantages:
- User-friendly interface: Designed with simplicity in mind, making it ideal for beginners.
- Free to use: A great choice if you’re just getting started with video editing.
- Minimal system requirements: Runs smoothly on most Windows PCs with standard specs.
**Step-by-Step Guide to Adding Green Screen Effects in Windows Movie
Maker**
Step 1: Set Up Your Green Screen
Before opening the software, you’ll need to capture your green screen footage. Here’s how to get it right:
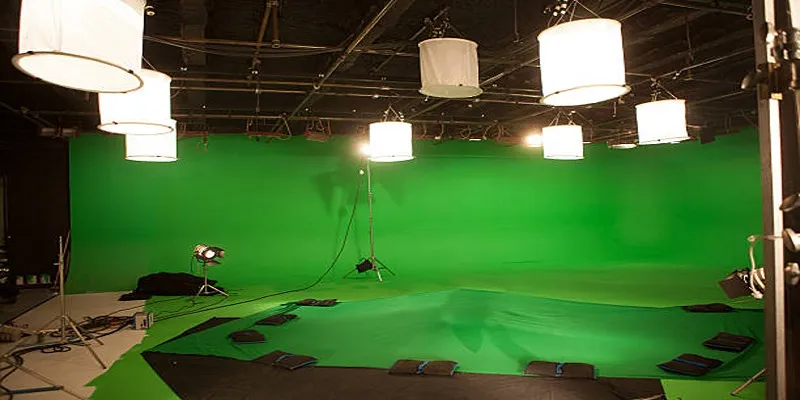
1. Create a Green Screen Setup
- Use a green backdrop: Purchase an inexpensive green screen cloth online or use a green sheet. Ensure the green material is non-reflective to prevent glare.
- Light it evenly: Use soft, even lighting to avoid shadows. Uneven lighting can result in parts of the green screen not being properly keyed out.
- Keep the subject separate: Position the person or object at least 3–5 feet away from the screen to prevent shadows and green reflections on them.
2. Film in High Resolution : Use a reliable camera (even a good smartphone camera works) and ensure the subject is in focus. Crisp footage will make editing much easier.
Step 2: Install the Windows Movie Maker Add-On for Green Screen
Windows Movie Maker, by itself, does not support green screen effects natively. However, with a free third-party add-on called Plugin for Windows Live Movie Maker Chroma Key , you can easily unlock this feature.
Here’s how to install it:
- Download the plugin from a trusted online source.
- Follow the installation instructions provided by the plugin.
- Once installed, restart Windows Movie Maker to access the green screen feature.
Step 3: Import Your Media Files
Launch Windows Movie Maker, click “Add Photos and Videos,” and select:
- Your green screen video (the one with the subject in front of the green backdrop).
- The image or video background you wish to replace the green backdrop with.
Step 4: Apply the Green Screen (Chroma Key) Effect
With your media files uploaded, follow these steps:
- Place the background video/image on the main timeline.
- Drag and drop your green screen footage directly above the timeline layer.
- Open the plugin’s settings, select the chroma key tool, and choose the green color to remove.
- Adjust the sensitivity sliders to ensure a clean cut. This step eliminates any green spill or fringing around the subject.
Step 5: Fine-Tune Your Video
Refine your project with these finishing touches:
- Crop any unwanted areas from the video frame.
- Adjust brightness and contrast if needed to make the subject blend naturally with the new background.
- Sync the transitions and audio to match the overall theme and pacing.
Step 6: Save and Export
After completing your edits, click “Save Movie” and choose your desired resolution. For the best quality, pick a resolution of 1080p or above.
Tips for Creating Professional Green Screen Videos
While simple editing tricks can make a world of difference, here are some additional tips to level up your green screen videos:
- Choose the right background: Ensure that the images or videos you use as backgrounds match the lighting and perspective of your subject.
- Avoid wearing green: Green clothing will blend with the background and create a “floating head” effect.
- Experiment with effects: Explore adding motion graphics or color grading to make your videos look cinematic.
- Preview often: Watch your video in progress to catch any rough edges before finalizing.
Common Green Screen Mistakes And How to Fix Them
Even with easy-to-use tools like Windows Movie Maker, mistakes can happen. Watch out for:
- Uneven lighting on the green screen: Fix by adding more lights or adjusting their position.
- Green reflections on the subject: Avoid by increasing the distance between the subject and the screen.
- Pixelated cutouts: Tweak the sensitivity settings in the chroma key plugin to achieve a cleaner effect.
Conclusion
Using a green screen can open up a whole new world of creative possibilities in your videos. With the right equipment and techniques, you can transport yourself or your subjects to any location or environment without leaving your home. Remember to choose high-quality fabrics for your green screen, use proper lighting techniques, and pay attention to common mistakes when filming. With practice and experimentation, you can achieve professional-looking results that will elevate the production value of your videos.
Related Articles

5 Best Mac Screen Recording Tools to Elevate Your Recording Game

Master the Green Screen Feature in iMovie 11: A Step-by-Step Guide

Best Tools to Record Streaming Content on Chrome Browser
Top 5 Split Screen Video Editors for Windows 10 and Mac Users

Top 8 Screen Recorder Apps for Effortless Video Recording

Simple Methods to Convert VOB to WMV for Beginners
2 Quick and Easy Methods to Crop Your Screen Recordings

The 8 Best To-Do List Apps for Android in 2025

Top 6 Screen Recorders for Firefox to Simplify Your Workflow
Top Movie Making Tools for New Creators and Experienced Editors
Icecream Screen Recorder Review: Features, Pricing & Alternatives

Free Online Screen Recorders with Simple and Fast Export Options
Popular Articles

How to Resolve Website Loading Issues in Chrome, Firefox & Safari
Exploring The 5 Best Canva Alternatives for Creative Projects

Learning Management System Comparison Made Easier: Top 5 Picks for 2025

Step-by-Step Guide to Creating and Presenting Slideshows on iPad

Top Food Community Apps for Recipe Sharing
Turn Low-Res Clips Into HD: Top 5 Converter Tools
Effective Tips to Make a Video Longer Without Losing Viewers
Unlocking Expert Knowledge for Free: Top Question-Answering Platforms

Maximize Your Customer Understanding with User Personas: A Top Tool
Boost Your Productivity: The 10 Best Google Docs Add-Ons You Need

The Best Project Management Tools for 2025: Trello, Asana, and More