 mww2
mww2
Cropping Videos in QuickTime: Best Methods and Alternatives
Video editing is an essential part of the digital content creation process. Whether you’re working on a personal project, creating marketing material, or editing a YouTube video, cropping videos can be a simple yet powerful editing tool. In QuickTime, Apple’s native video player, cropping options are somewhat limited. While QuickTime offers a basic set of tools for video playback, it lacks comprehensive video editing features such as cropping. For those who rely on QuickTime but need more flexibility, exploring alternative solutions becomes necessary. This article will not only guide you on how to crop videos using QuickTime but will also suggest some excellent alternatives that give you greater control over your edits.
Cropping Videos in QuickTime: The Basic Process

QuickTime is a great player, but not so much when it comes to video cropping because it lacks the features that other full-fledged video editors possess. Nevertheless, you can perform some basic operations, like trimming the video or tweaking the frame. To actually crop the video, one must use QuickTime’s screen recording and trimming capabilities.
To crop a video in QuickTime, you need to use a workaround. Begin by opening your video file in QuickTime Player. Play the video and pause it at the frame you wish to start cropping. Click on the “File” menu, choose “New Screen Recording,” and move the screen recording box to the region of the video you want to crop. This method doesn’t crop the video per se (the entire video still plays), but it helps focus on a specific section of the video.
Though this hack can be useful in certain cases, especially if you don’t need precise cropping, it’s not ideal for professional-level, high-quality editing.
Why QuickTime’s Cropping Feature is Limited
QuickTime is primarily designed as a media player rather than a full-fledged video editor. Its editing tools are basic. While it allows you to trim videos and perform simple edits, it lacks advanced features like cropping, rotating, or adjusting the aspect ratio. This makes QuickTime less suitable for users who require precise video cropping for professional or creative purposes.
Apple designed QuickTime to cater to general media playback and light editing. While you can cut a portion of a video or record part of your screen, these tools are not advanced enough for serious video editing. For more robust cropping options, you’ll need to explore other software solutions that provide greater flexibility and control.
Alternative Solutions for Cropping Videos
While QuickTime may suffice for basic needs, there are several alternative solutions that offer much more advanced cropping options. These tools range from free software to professional-grade applications, depending on the complexity of your project.
iMovie (Mac)
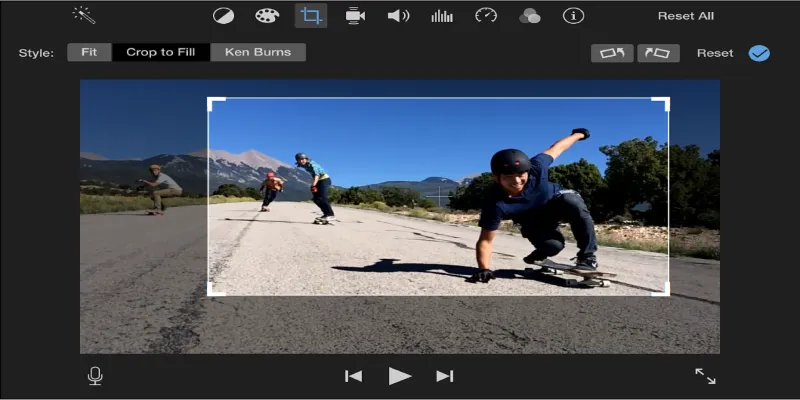
iMovie is Apple’s video editing software, and it comes pre-installed on many Mac devices. It provides a much more intuitive and feature-packed environment for video editing compared to QuickTime. Cropping a video in iMovie is simple and efficient.
To crop a video in iMovie, import your video file into the project. Then, click on the video clip you want to edit. In the viewer, you’ll find the “Crop to Fill” option, which allows you to select the area of the video you want to keep. You can drag the frame to adjust the crop and click Apply once you’re happy with the result.
iMovie also offers other helpful editing tools, such as adding transitions, filters, and sound effects, making it a great choice for those seeking an all- in-one video editing solution. Plus, since it’s free for macOS users, it’s an accessible tool for most people.
Adobe Premiere Pro (Windows, Mac)
If you need a more professional and versatile video editing tool, Adobe Premiere Pro is one of the best options available. Unlike QuickTime or iMovie, Adobe Premiere Pro provides a range of advanced tools for precise video cropping, trimming, and overall professional editing.
In Premiere Pro, cropping a video is straightforward. Import your video file and drag it to the timeline. Next, select the clip and go to the “Effects Controls” panel. Here, you’ll find options for cropping the video by adjusting the left, right, top, or bottom margins. You can also use the “Transform” effect to scale and reposition the video, offering more control over how the video appears in the final edit.
Premiere Pro is widely used in the film, television, and content creation industries due to its comprehensive toolset. However, it’s important to note that Adobe Premiere Pro requires a subscription, making it a more expensive option compared to QuickTime or iMovie.
Final Cut Pro X (Mac)
Final Cut Pro X is another powerful video editing software by Apple, offering professional-level video editing capabilities. It’s considered a step up from iMovie, providing more advanced features like multi-cam editing, 360-degree video editing, and, of course, precise cropping tools.
To crop a video in Final Cut Pro X, import your video and place it on the timeline. Click on the video, and in the “Inspector” window, select the “Crop” tool. You’ll be able to use on-screen controls to adjust the video’s framing, enabling you to crop it with precision. Final Cut Pro X also lets you adjust the aspect ratio and apply other effects, making it suitable for users who require high-level video editing.
Although Final Cut Pro X comes with a steep learning curve and a high price tag, it’s an excellent choice for professional video editors working on complex projects.
Conclusion
Cropping videos in QuickTime is possible with workarounds, but it’s not ideal for precision edits. For better results, alternatives like iMovie, Adobe Premiere Pro, Shotcut, and Final Cut Pro X offer more flexibility. These tools cater to all editing levels, from beginners to professionals, with features suited to different needs. Whether you’re looking for a simple edit or advanced functionality, these options help streamline your video editing process and enhance your creative control. Choosing the right tool will ensure your video editing is efficient and effective.
Related Articles

3 Easy Ways to Create a Stunning Memory Video on Your iPhone
Everything You Need to Know About CapCut Video Upscaler
Best AI Anime Upscalers Reviewed: Which One Stands Out?

Quick and Simple Ways to Create GIFs from MOV Videos

Everything You Need to Know About Converting to MP4

5 Simple Ways to Convert 3GP to MP4 Effortlessly

Step-by-Step Tips to Create Engaging Tutorial Videos That Your Audience Will Love

How to Easily Edit and Trim Videos on Your Android Devices

How to Colorize Your Black and White Videos: 5 AI Tools You Should Try
Popular Articles

The 8 Best ChatGPT Alternatives for Businesses and Content Creators

Quick and Simple NEF to JPG Conversion: 3 Best Tools

Top 6 Electronic Signature Apps in 2025 to Sign Documents with Ease

Best macOS Auto Clickers for Fast Task Execution

Maximize Your Customer Understanding with User Personas: A Top Tool

Unlocking HDR Magic: How to Get a Free Copy of Photomatix Essentials

Offline Loom Alternatives: The Best 5 Tools for Screen Recording

Everything You Should Know About 123Apps Online Video Editor
An In-Depth Review of Microsoft Clipchamp and Its Practical Applications

How to Create Google Calendar Events from Microsoft To Do Tasks: A Guide

How to Set Custom Avatars for Users in WordPress Without Gravatar: A Guide
