mww2
mww2
iRiver Video Fix: How to Convert to MP4, WMV, AVI, or FLV
When you’re trying to load a video onto your iRiver player and the file won’t play, it’s usually due to a format issue. Most iRiver models don’t support every video type by default, preferring MP4, WMV, AVI, or FLV formats. If you’ve encountered this problem, don’t worry—you don’t need to purchase new software or hire a technician. All you need is a reliable video converter. The tools below are easy to use and support all the main formats compatible with iRiver.
This guide keeps things simple—no jargon, no fluff. Follow these clear steps on Windows or Mac to convert your videos quickly and correctly.
How to Convert Video to MP4/WMV/AVI/FLV for iRiver?
Use HandBrake to Convert Video for iRiver
HandBrake is a free, open-source tool available for Windows, macOS, and Linux. It’s one of the most reliable options for converting to MP4, which is the safest choice for iRiver playback.
- Download HandBrake from handbrake.fr and install it.
- Launch the app and click “Open Source” to add your video file.
- In the “Summary” tab, select MP4 as the format.
- Click the “Video” tab. Set the video codec to H.264, which is best for compatibility.
- Adjust resolution if necessary. Reducing it can facilitate playing on smaller iRiver screens—use 320x240 or similar.
- Select a place to save the file by clicking “Browse.”
- Click “Start Encode” to begin converting.
HandBrake does not support WMV or FLV as output but works well with MP4. It allows control over size, bitrate, and resolution. While it may lack flashy branding, it is highly effective.
VLC Media Player for Format Conversion
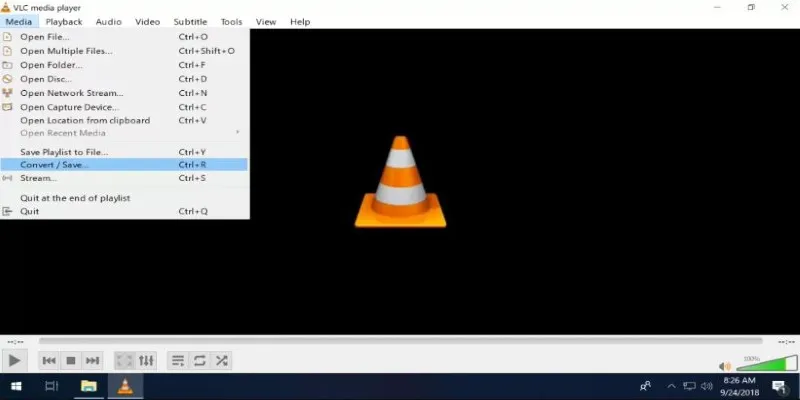
VLC is more than a video player—it can also convert files. It supports virtually every format you’ll use for iRiver, including MP4, WMV, and FLV. It’s available for Windows and Mac.
- Open VLC and click “Media” > “Convert / Save.”
- In the popup, hit “Add” and select your video file.
- Click “Convert / Save” at the bottom.
- Under “Profile,” choose your output format:
- “Video – H.264 + MP3 (MP4)” for MP4
- “Video – WMV + WMA (ASF)” for WMV
- “Video – FLV (FLV1 + MP3)” for FLV
- Click “Browse” to set a file name and location.
- Hit “Start” to begin conversion.
VLC isn’t as user-friendly as dedicated converters, but it’s free and very flexible. If you want to quickly convert a file without needing advanced controls, it’s a solid choice.
Wondershare UniConverter (Free Trial Available)
If you prefer a tool with a modern interface and advanced features, Wondershare UniConverter is worth considering. It supports MP4, WMV, AVI, FLV, and many more formats, available for both Windows and Mac.
- Install Wondershare UniConverter from the official site.
- Open the app and click “Add Files” to select your video.
- At the bottom, choose your output format (MP4, WMV, AVI, or FLV).
- You can use the gear icon next to the format to customize resolution, codec, and bitrate.
- Click “Convert” to start.
The free trial has limits—you might get a watermark or a time cap—but it’s enough for testing. This tool also supports batch conversion and has options to transfer directly to devices, though iRiver may need to sync via its software.
Wondershare is for users who want a polished interface with clearly laid out settings. It’s also fast, which is important when converting large files.
Freemake Video Converter (Free with Optional Upgrades)
Freemake is another Windows-only converter that supports all major formats for iRiver. It’s simple, drag-and-drop based, and ideal for casual users.
- Download Freemake Video Converter from the official site.
- Launch the program and drag your video file into it.
- Select a format button at the bottom (MP4, WMV, AVI, or FLV).
- Choose from the presets (you’ll see options for mobile, tablets, etc.) or click “Edit Preset” to customize resolution and bitrate.
- Set output location and hit “Convert.”
The free version might add a small watermark, but the output works fine on most iRiver devices. The interface is beginner-friendly. Even if you’re not tech-savvy, you can convert a video in just a few clicks.
Freemake is especially helpful if you don’t want to mess with codec settings or worry about profiles—it handles most of that for you.
Convert with Any Video Converter (Free & Paid)
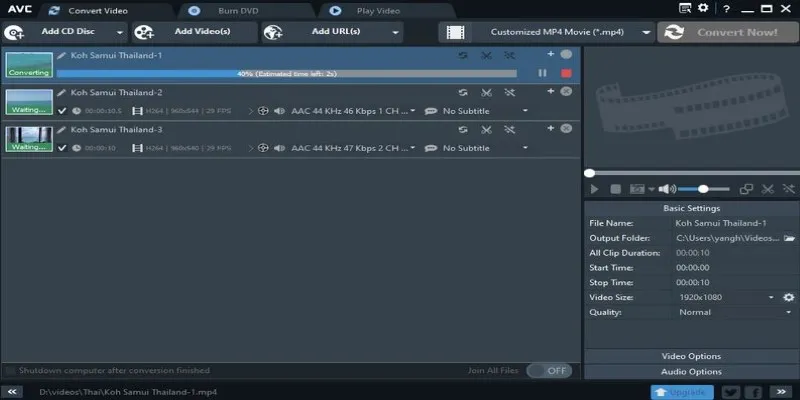
Any Video Converter (AVC) is available for both Windows and Mac. It covers every major video format, offers basic editing features, and even supports downloading videos from online platforms.
- Download the free version of Any Video Converter.
- Launch the app and click “Add Video(s)” to bring in your files.
- In the top-right corner, choose the output format (MP4, AVI, WMV, FLV).
- Use the “Basic Settings” and “Video Options” tabs to adjust frame rate, bitrate, or resolution.
- Set the output path and hit “Convert Now.”
AVC strikes a balance between power and simplicity. It also has a Pro version with extra features like GPU acceleration, but the free version is more than enough for everyday file conversion.
It’s great if you need more control than VLC offers but don’t want the limitations of a trial-based converter.
Conclusion
Each tool in this guide walks you through the conversion process, so you don’t need a summary. Just choose the converter that fits your comfort level—whether it’s a simple tool like Freemake, a flexible one like VLC, or a full-featured option like Wondershare. Match the output format with what your iRiver model supports, typically MP4 or WMV. Stick to lower resolutions for better playback on smaller screens. Start with a short test video before converting everything to avoid surprises and ensure smooth playback. Testing will help ensure the conversion quality meets your expectations.
Related Articles
Best Free Tools to Convert MKV to MP4 Online and Offline
Simplest Methods to Convert AVI Files into XviD, SWF, or FLV Formats

Best and Most Efficient Ways to Convert FLV

Simple Methods to Convert VOB to WMV for Beginners
Master Subtitles: Open and Embed Captions in Your Videos
Best Free and Paid AVI Splitters for Splitting AVI Videos
How to Watch AVI Files on an iPad: 6 Simple Solutions
GIF to WebM Conversion Made Easy: A Guide for PC and Mac Users

Top 10 QuickTime Player Alternatives for Smooth Media Playback
How to Convert FLV Files to WAV Format in Minutes

7 Reliable Methods to Convert Video Files into RM/RMVB
How to Make Any Video Play Smoothly on Your BlackBerry PlayBook
Popular Articles

A Comprehensive Guide to Creating a Sticky Floating Sidebar Widget in WordPress
Discover 8 SurveyMonkey Automation Ideas to Boost Efficiency

A Developer’s Guide to Leveraging AMD OpenCL™ APP for Enhanced Performance

Comprehensive Review of Remo Video Repair and Its Top Alternative

How to Enable Users to Subscribe to Comments in WordPress Easily
Best DAV File Players to Watch Encrypted Videos on Your PC
Real Reasons to Convert Video Files and Make Them Work Better

The Future of Creativity: The 9 Best Brainstorming Tools in 2025

The Best Dictation Software: Transforming How You Work and Communicate

Understanding the M4V File Format: Features, Compatibility, and Conversion Methods

Unlocking Serial Communication: Free Tools for Debugging