 mww2
mww2
Convert Any Video to RM/RMVB: Easy Tools and Methods
Some older media players and systems still rely on RM or RMVB formats, which can be frustrating when your video is in a more modern format like MP4 or MKV. Whether you’re converting for compatibility, compression, or just personal preference, there are several ways to get the job done using tools that support RealMedia output. From simple software to command-line utilities and even browser-based options, converting any video to RM or RMVB isn’t hard once you know where to look.
How to Convert Any Video to RM/RMVB with RMVB Converter
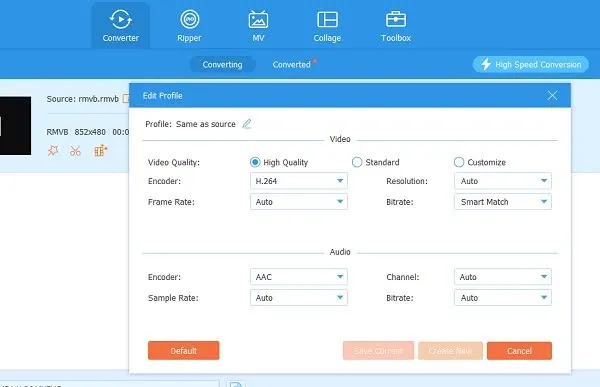
1. Use Standalone RMVB Converter Software (e.g., RealMedia Converter or
Any Video Converter)
One of the most reliable ways is to use a dedicated video converter that supports RealMedia output. These programs are often small, lightweight, and easy to work with. Start by installing the software and launching it. Most of these converters allow drag-and-drop, so you can just pull the video into the main window. Choose RM or RMVB as your output format. Some of them will let you tweak bitrate, resolution, frame rate, and audio settings. That’s useful if you want to reduce the file size or match specific playback hardware requirements.
Hit the convert button, wait for it to process, and you’re done. Since these programs work offline, you won’t need to use the internet or deal with upload limits. That also means they tend to handle longer videos or large files better.
2. Convert with FFmpeg (Command Line Method)
If you prefer more control or you’re comfortable with a terminal window, FFmpeg is a solid choice. It’s fast, supports nearly every video format out there, and it’s free. To convert a file using FFmpeg, you’ll need to type a command like:
ffmpeg -i inputfile.mp4 -c:v rv10 -c:a cook -f rm outputfile.rm
Here’s what’s happening: -i points to the original file, -c:v and -c:a tell FFmpeg which video and audio codecs to use (RealVideo and Cook, respectively), and -f rm specifies that the output should be in RealMedia format. You might have to download the necessary codec libraries if they aren’t included in your build. This method is ideal for batch processing or scripting multiple conversions.
3. Use an Online Video Converter with RMVB Output Support
If you’re only converting one or two files and you don’t want to install anything, online converters can do the trick. Some platforms still support RMVB or RM formats in their list of outputs. Upload your video, select RM or RMVB, and start the process. Once it’s done, you’ll get a download link. This method works well for small files and quick tasks. Just be mindful of upload size restrictions or slower speeds with large files. Online tools don’t always offer deep customization, but if you’re just aiming to get the file in the right format and don’t need a lot of tweaking, they’re convenient.
4. Use MediaCoder for RMVB-Specific Encoding
MediaCoder is another desktop tool that’s been around for years. It’s known for offering support for obscure formats and has a dedicated RealMedia encoder. Once installed, open the app and import your video file. Go to the video tab and set the encoder to RealVideo. Under audio, set the codec to Cook or AAC if available. Then, choose the RM or RMVB container for the output options.
This software tends to offer more detailed encoding options than most converters. If you’re dealing with compatibility issues or want to squeeze the file size down for older devices, MediaCoder helps you fine-tune every part of the file.
5. Use Format Factory for Quick RMVB Conversion
Format Factory is a free utility that supports RM and RMVB among dozens of other formats. It has a basic, user-friendly interface that gets the job done without needing to fuss with settings unless you want to.
Open Format Factory, choose the RM or RMVB option, and add your file. There’s a button for output settings if you want to change the resolution, bitrate, or quality. Once you’re ready, press start. It queues the file and processes it within seconds to minutes, depending on size. The benefit here is ease of use. No need to read through menus or tweak settings unless you really want to. It works for almost any common format as input, so you won’t run into format- mismatch issues.
6. Use Avidemux with External Encoder Setup
Avidemux doesn’t natively support RealMedia output, but there’s a workaround if you’re tech-savvy. By setting it up to output a raw stream and then piping that stream through a RealMedia encoder (via command line or another app), you can generate RMVB files indirectly.
You’ll need to save the raw output in a format compatible with the encoder and run the stream through something like a custom FFmpeg script. This method isn’t for everyone, but if you’re familiar with file containers and video pipelines, it’s another route.
7. Try Legacy Tools (Like RealProducer or Helix Producer)
RealNetworks used to provide RealProducer and Helix Producer software, which are made specifically to create RealMedia files. While outdated, they still work on certain operating systems, especially older Windows versions.
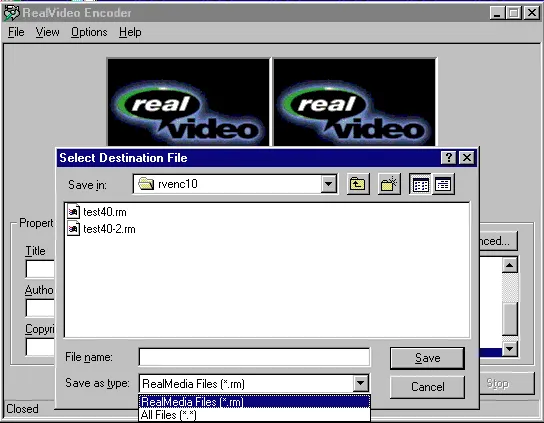
You’ll need to install the software, load your video, and choose output profiles. These tools are strict about codecs, so your input file must be supported. If you’re trying to maintain authentic RealMedia encoding, like for archival or broadcasting compatibility, this is the way to go.
Final Thoughts
Converting to RM or RMVB isn’t as common today, but if you’re working with devices, software, or networks that still use these formats, it’s good to know the tools are still available. From drag-and-drop software to command-line solutions and even online converters, you’ve got plenty of ways to make the switch. Just pick the method that matches your comfort level and your file size, and you’ll be set.
Related Articles

The 8 Best To-Do List Apps for Android in 2025
Explore the 10 Best Video Editing Software for Creators

8 Best To-Do List Apps for Mac in 2025

How to Easily Convert AVI to MOV Using 4 Reliable Tools

Top 9 Apps to Effortlessly Add Text to Your Videos in No Time

MPEG to MP3 Conversion Made Easy: A Complete Guide

How to Convert MPEG to WAV: A Step-By-Step Guide

Best Practices for Converting AVI Files to JPG Format
How to Easily Convert AVI to MOV Using 4 Reliable Tools
Top Free Methods to Convert M2TS Files to QuickTime MOV

Simplest Methods to Convert AVI Files into XviD, SWF, or FLV Formats

Top Tools to Convert MXF Files for Seamless Sony Vegas Compatibility
Popular Articles

Simplify Your Project Management Software Comparison: Top 5 Choices

Best Tools and Methods to Open RMVB Files on Any Device

Top Tools to Convert MTS Files Quickly and Easily

Streamline Your Workflow: 6 Effective Ways to Automate Project Management

Which Are The 6 Best Email Clients for Mac: A Comprehensive Comparison

5 Insightful Tools for Big Data Project Management You Can’t Miss

Comprehensive Guide to Using Bandicam for Screen and Game Recording
Flowframes Review: Revolutionizing AI Frame Interpolation for Videos

Streamline Your Workflow with These Powerful Social Media Platforms

The Truth About Lucas AI Video Generator: A Deep Dive

Discover the 10 Most Effective Userback Alternatives
