mww2
mww2
MP4 to FLV Conversion Made Simple: Top Tools and Tips
If you’re trying to upload a video to an older website or platform and find that it still prefers FLV, you’re not alone. While MP4 is more common these days, FLV still lingers in many corners of the internet. Maybe it’s a niche CMS, an embedded video player from the 2010s, or a streaming tool that still leans on the Flash Video format. Either way, converting MP4 to FLV is still a relevant task. Luckily, you’ve got several ways to do it—each with its small perks, quirks, and system compatibility. Let’s walk through the different methods you can use to convert MP4 to FLV on both Windows and Mac—without fuss or guesswork.
How to Convert MP4 to FLV Format for Online Sites on Windows and Mac
Use VLC Media Player
VLC isn’t just for watching videos—it can also convert them. If you’ve already got it installed, you’re halfway there. This method works on both Windows and Mac. Open VLC, go to the Media tab, and select “Convert/Save” on Windows (or File > Convert/Stream on Mac). Add your MP4 file, then set the output format to FLV. You’ll see some format choices, so pick one that says FLV or lets you manually enter .flv in the file extension.
Once done, hit Start (or Save), and VLC handles the rest. The output will be saved to the location you choose, and your video will be in FLV format. Keep in mind, VLC’s interface isn’t always the most intuitive, and sometimes it won’t warn you if something goes wrong. Still, it’s a reliable go-to, especially when you don’t want to install another tool.
Try FFmpeg for More Control
If you’re comfortable with command lines, FFmpeg gives you complete control. It’s one of the most powerful video tools out there and works on both Windows and Mac.
Install FFmpeg, open Terminal (or Command Prompt), and use a simple line like:
ffmpeg -i input.mp4 -f flv output.flv
That’s all it takes. You can also tweak frame rate, resolution, bit rate, or audio settings if needed. It’s especially useful when working with multiple files or creating scripts for batch conversions. Just be sure the FLV format works with your final destination. FFmpeg is strict about syntax, so double- check your input if the command doesn’t work the first time.
Use HandBrake (With a Little Workaround)
HandBrake is often seen as an MP4 and MKV converter, but it has the potential to do more—if you use it the right way. While FLV isn’t listed as a native output, you can pair it with FFmpeg or use it as a preprocessing tool.
Start by converting your MP4 to a basic format that supports easier FLV encoding (like AVI or raw MP4), then run that output through FFmpeg or VLC for the final conversion. This method is helpful if your MP4 has complex encoding or variable frame rates that other tools don’t handle well. It’s not the fastest route, but it works when other methods stumble.
Use Online Video Converters (With Caution)
Several web-based tools offer MP4 to FLV conversion. These include sites that let you upload your video, choose the output format, and download the FLV file. You drag your MP4 file onto the webpage, pick FLV, and wait while the upload and conversion happen in the background. Once done, you download the FLV file.
Sounds easy—and it is—but be cautious. These tools might have file size limits, ads, slow processing times, or unclear privacy policies. If your video is short and not sensitive, it’s a good option. For anything longer or private, it’s better to stick with a desktop app.
Use Freemake Video Converter (Windows Only)
Freemake has been around for a while and is built for people who want things done without dealing with too many settings. Download it, drag your MP4 file into the window, choose FLV from the list of formats, and click Convert.
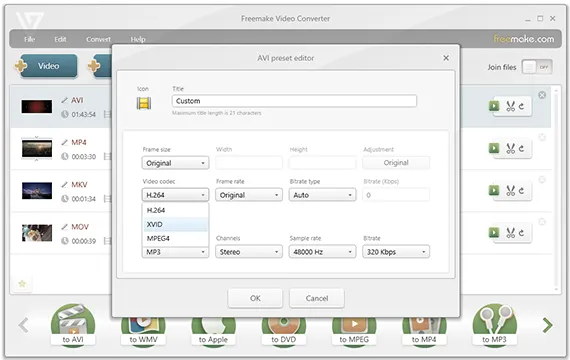
Freemake tends to be beginner-friendly and guides you through the process with clear labels. Just watch out for extra offers during installation—it’s best to use the custom install option to skip anything unrelated. It’s a good fit if you want something that just works and don’t care about tweaking every little detail.
Use Movavi Video Converter (Windows and Mac)
Movavi isn’t free, but it’s polished and works well on both platforms. Once installed, you add your MP4 file, select FLV as the target format, and hit Convert. The interface is clean, and it doesn’t require you to know much about codecs or video specs. What makes it stand out is how it balances simplicity with control. If you’re okay with paying or using a trial version with a watermark, this one’s reliable and quick.
Use QuickTime with Plugins (Mac)
Out of the box, QuickTime doesn’t export to FLV. But with the right plugins, such as Perian (though now outdated), or third-party tools that extend QuickTime’s features, you can make it work. This isn’t the easiest method, and it takes some digging around for older tools that are compatible with your current OS. However, for those who like keeping everything within the Apple ecosystem, it might be worth the effort.
Use Adobe Media Encoder (Cross-Platform, Paid)
If you’re already working with Adobe tools like Premiere Pro or After Effects, Adobe Media Encoder is probably installed. It supports FLV output, though it depends on the version you’re using.

Open Media Encoder, add your MP4, choose FLV as the export format, and start the queue. Since this is part of a broader suite, you get options to match video quality with the target platform, set presets, or integrate it into a workflow. It’s not something to download just for converting one file, but if you already have it, this might be the most polished option.
Conclusion
Converting MP4 to FLV isn’t difficult—there are plenty of options. If you prefer free and open-source tools, VLC and FFmpeg are solid. If you like smoother interfaces and are okay with paid software, Movavi or Adobe Media Encoder make it easier. For occasional needs or when using someone else’s machine, online converters can help—but only if privacy isn’t a concern.
Related Articles
How to Convert FLV to MP4 for Free: Top Tools and Easy Methods
5 Simple Ways to Convert FLV Files to MOV Format on Windows

The 8 Best To-Do List Apps for Android in 2025

8 Best To-Do List Apps for Mac in 2025

From Video to Audio: 10 Top MP4 to MP3 Converters in 2025
Free Ways to Convert HEVC to MP4 Without Losing Quality
Simple Methods to Convert ISO Files to MP4 for Beginners

Top 3 Simple Ways to Convert WMA to MP4 Easily
Simplest Methods to Convert AVI Files into XviD, SWF, or FLV Formats

Top Tools to Convert MXF Files for Seamless Sony Vegas Compatibility

How to Easily Convert AVI to MOV Using 4 Reliable Tools
Top 7 Methods for Effortless MP4 to MOV Conversion
Popular Articles

3 Best AI Voice Generators to Enhance Your Content in 2025

Boost Your Workflow with the Best Productivity Apps for iPhone in 2025

Step-by-Step Guide to Using Autocorrect in Google Docs
HEVC to MOV Conversion Made Simple for Windows Users

The 8 Best Event Management Software Platforms to Simplify Your Planning
The Ultimate Guide to Website Builders: Wix, Squarespace, Shopify, and Beyond

Explore the Latest Upgrades in Ubuntu Touch OTA-8

Step-by-Step Guide to Adding Media in WordPress Comments with oEmbed
Step-by-Step Guide to Editing TikTok Videos on iPhone

The Best DocuSign Alternatives in 2025 for Simple, Secure E-Signatures
Best PCB Design Software to Streamline Your Workflow